
Introduction to Vagrant and Packer
This post features a tutorial on how to use Vagrant in combination with Packer for the creation of virtual machines or in short VM’s. Vagrant and Packer are useful tools in order that enable provisioning of multiple development environments at the same time. During any time in the tutorial you can skip ahead and download the discussed files, this way you could immediately skip to the Vagrant part.
When working on projects one of the main obstacles developers face is code that runs well on their system but not on the systems of other developers. A way to solve this is creating a virtual machine for each development environment. However, one of the problems you might encounter creating “Golden Images” is that it takes a lot of time and effort to maintain these; if it is necessary to upgrade to a new JDK or change to another IDE all the developers must get that newly created VM which can be multiple gigabytes in size.
This is where Vagrant in combination with Packer might offer a solution. Instead of creating a new golden image each time Packer is used to create a base box with a running OS which is thereafter further configured by Vagrant.
Vagrant works with a box, that is in fact a virtual machine packed in a box format. This virtual machine could be a VMWare image, Virtualbox image or even an image that is meant for the Amazon Cloud. In order to work with Vagrant we need such a “base-box”.
In our case we are going to build one using Packer; but there are a lot of boxes already available at https://atlas.hashicorp.com/boxes/search. The boxes found on this page are boxes created by the community and come in almost every flavor.
Prerequisites
This tutorial is done using Windows as host OS. However, it is possible to do this tutorial on Linux with little to no modification. For this tutorial the following sofware is needed:
- Virtualbox
- Vagrant
- Packer
- Notepad++ or similar (needed for Unix/Linux EOL)
- Example software package jdk-8u91-linux-x64.rpm
Install Virtualbox and Vagrant using default settings. Packer can’t be installed; for easy access it is recommended to put this in the working directory where the base box is created.
Vagrant versus Packer
Before we start creating a box we fist need to understand the difference between Packer and Vagrant. Vagrant works with a so called golden image. This is an image created by for example Packer, you can compare this with a freshly installed operating system. I previously mentioned golden images, but the difference is quite obvious. The images created with Packer are almost always smaller in size and contain only the bare minimum of software in contrary to the golden images mentioned before; these are most of the time fully configured environments.
Boxes created with packer have very limited provisioning done to it, it is possible to do some provisioning with Packer. However, it is a lengthy process to do so because debugging takes a lot of time in case something is amiss. Therein lies the main difference, Packer is a great tool for building a minimal provisioned base image whereas Vagrant is great for setting up a specific environment; be it for a developer, an artist or for a server.
Packer
Packer is a simple command-line driven tool which uses the following to create an box. First and foremost it need a configuration file; this is a JSON file that tells Packer which steps it needs to take to create our base-box.
Second it needs an image in the ISO format, in this example we use Red Hat 7 server (rhel-server-7.2-x86_64-dvd.iso). Packer is not limited to only Linux, it supports Window and Mac OS X.
When working with a slower internet connection it is recommended that you store the ISO file locally. However, it is possible to get an image from an HTTP URL.
A Packer JSON file is structured as followed:
 {
      "provisioners": [
           {
           }
      ],
      "post-processors": [
           {
           }
      ],
      "builders": [
           {
           }
      ]
 }
Builders are used to tell Packer where to get the ISO file and it contains a basic configuration for the VM; more importantly it contains the configuration used to configure the base of the OS.Provioners contain commands that are executed after the VM has booted once, this should only be used for basic provisioning such as adding a specific driver, software repository, desktop environment or something similar.
Post-processors are needed to tell Packer what sort of box to create; for example Virtualbox, VMware, etc.
Creating the base box
Lets start by setting up a folder for our Packer box. Create a new folder on a hard drive where you have got enough empty disk space. Depending on the choice of OS the size of the base box might be between 1-20GB. Call the folder you just created RedHat_BaseBox. For your convenience it might be a good idea to put the Packer executable in this directory.
Lets get started by creating the builder block mentioned before, create a new text file, name this redhat_rhel_7.2.json and configure it to have Unix/Linux EOL. It is suggested to use an advanced editor such as Notepad++. Open the file and place the previously mentioned structure into it, after doing so edit the building block making it look similar to the one displayed below.
"builders": [
     {
          "type": "virtualbox-iso",
          "boot_command": [
               "<tab> text ks=http://{{ .HTTPIP }}:{{ .HTTPPort }}/ks.cfg<enter><wait>"
          ],
          "boot_wait": "10s",
          "guest_os_type": "RedHat_64",
          "http_directory": "http",
          "iso_url": "file:////C:/Isos/rhel-server-7.2-x86_64-dvd.iso",
          "iso_checksum": "03f3a0291634335f6995534d829bd21ffaa0d000004dfeb1b2fb81052d64a4d5",
          "iso_checksum_type": "sha256",
          "ssh_username": "tutorial",
          "ssh_password": "P@ssw0rd",
          "ssh_wait_timeout": "9000s",
          "ssh_port": 22,
          "shutdown_command": "echo 'tutorial' | sudo -S shutdown -P now",
          "guest_additions_path": "VBoxGuestAdditions_{{.Version}}.iso",
          "virtualbox_version_file": ".vbox_version",
          "vboxmanage": [
               [ "modifyvm", "{{.Name}}", "--memory", "2048" ],
               [ "modifyvm", "{{.Name}}", "--cpus", "1" ]
          ]
     }
]
I will not go into the specifics since Packer is well documented on the Hashicorp site. Some important command I do highlight.
- boot_command: This tells Packer what to execute after booting from the ISO. Key input is simulated with brackets; commonly used commands are <tab>, <enter>, <wait10>. In this case we feed it an URL to a kickstart file for Red Hat, this simplifies the installation.
- boot_wait: This tells Packer to wait for a given amount of time when it boots the first time from the ISO.
- guest_os_type: This tells Packer how to configure your VM for a specific OS.
- http_directory: This tells Packer the directory where to find our configuration file(s).
- ssh_*: These tell Packer how to connect to our VM, this is needed for provisioning.
- vboxmanage: Tells Packer how to configure for a specific VM, like Virtualbox.
The next step is configuring the provisioners, keep in mind that its better to do most of the provisioning in Vagrant. The scripts listed below are used in the following fashion:
- base.sh: Add some packages, repositories and some little configuration.
- virtualbox.sh: This will install Virtualbox specific things like the Virtualbox Guest Additions. These additions are a minimal requirement for using Vagrant on this box.
- cleanup.sh: This is where some files left from the installation will be cleaned on your VM.
- zerodisk.sh: This basically optimizes disk space on your VM (it is suggested leaving this time consuming option off if you are currently debugging the whole Packer process).
 "provisioners": [
      {
           "type": "shell",
           "execute_command": "echo 'tutorial_user'|sudo -S bash '{{.Path}}'",
           "override": {
                "virtualbox-iso": {
                     "scripts": [
                          "scripts/base.sh",
                          "scripts/virtualbox.sh",
                          "scripts/cleanup.sh",
                          "scripts/zerodisk.sh"
                     ]
                }
           }
      }
 ],
Post-processors tell Packer what kind of output file we want.
 "post-processors": [
      {
           "type": "vagrant",
           "override": {
                "virtualbox": {
                    "output": "redhat-7-2-x64-virtualbox.box"
                }
           }
      }
 ],
In the directory you saved your json file create a folder named http, this is where Packer will find the kickstart file.
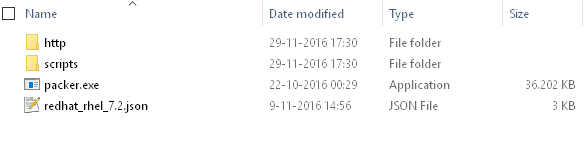
In order to keep this tutorial on topic it is possible to use the following kickstarter file for the Red Hat image. This file is configured to work with the json script shown above, just place the file in the earlier created http directory. The scripts are also available at this link, after downloading put them in a folder called scripts. The directory structure should look similar to this:

If for some reason it you where unable to get the json file working properly it is possible to download the file here.
Now we are ready to run Packer; before you start make sure the firewall does not block the ssh port. Open a command line prompt and browse to your directory (or ctrl + alt + right mouse -> Command prompt here).
Run the following command to validate your configuration file:
packer validate redhat_rhel_7.2.json
If there where no errors run the following command to start the Packer process:
packer build redhat_rhel_7.2.json
Building the image may take a while (15 minutes) depending on the speed of your CPU and hard drive, if all went successful there should be an image called redhat-7-2-x64-virtualbox.box in your working directory.
Note: It is possible to create multiple boxes with one configuration file at the same time. This could be used to create a VMWare, Virtualbox and Amazon box in one go. However, this is out of the scope of this tutorial.
Vagrant configuration
Now that we’re done with creating a base box we can start to provision it with Vagrant. If you skipped ahead and just want to follow the Vagrant part of the tutorial you can download the box at this link. The Vagrant configuration file is much like Packer, it is sort of divided into three sections. Before we are going into depth, first create a new directory in which to put the Vagrant configuration. In this directory create a file without any extension with the name “Vagrantfile”. Open this file in a text editor and use the following instructions.
The first section basically tells Vagrant how the VM should be named and what user to use to connect to it with SSH.
 # -*- mode: ruby -*-
 # vi: set ft=ruby :

 # All Vagrant configuration is done below. The "2" in Vagrant.configure
 # configures the configuration version (we support older styles for
 # backwards compatibility). Please don't change it unless you know what
 # you're doing.
 Vagrant.configure("2") do |config|

      # Boxname
      config.vm.box = "RedHat7"
      config.vm.hostname = "rhel7"

      # ssh user and password needed for provisioning
      config.ssh.username = "tutorial"
      config.ssh.password = "P@ssw0rd"
The following section describes the configuration for Virtualbox. This has a direct influence on how your Virtualbox is configured and performs, useful settings like hardware acceleration or the ability to copy/paste to your VM can be set here.
      config.vm.provider "virtualbox" do |vb|

           # Display the VirtualBox GUI when booting the machine
           vb.gui = true
           vb.cpus = 2

           # Setup videocard
           vb.customize ["modifyvm", :id, "--vram", "128"]
           vb.customize ["modifyvm", :id, "--accelerate3d", "on"]

           # Setup copy/pasta
           vb.customize ["modifyvm", :id, "--clipboard", "bidirectional"]
           vb.customize ["modifyvm", :id, "--draganddrop", "bidirectional"]

           # Configure memory
           vb.memory = "4096"

           end
The final section is meant for provisioning, normally this is configured in such a way that a user can type “vagrant up” allowing him to start working at a fully configured VM within 5 minutes.
This tutorial has a Vagrant file that only contains minimal provisioning.
           # Enable provisioning with a shell script. Additional provisioners such as
           # Puppet, Chef, Ansible, Salt, and Docker are also available. Please see the
           # documentation for more information about their specific syntax and use.
           # privileged false is possible because we disabled asking for password "NOPASSWD" in packer,
           # further down the installation this will later be removed in ./setup_user.sh
           config.vm.provision "shell", privileged: false, inline: <<-SHELL

                cd /vagrant/scripts
                # Install additional software
                ./software_install.sh

                # Set environment variables
                sudo ./environment_variables.sh

                # Setup user
                ./setup_user.sh

                echo "Installation done, enjoy your desktop"
           SHELL
 end
As in the Packer part of the tutorial, the scrips can be downloaded at this location. Like before put them in a scripts folder. Download the earlier mentioned JDK and put the rpm file in the scripts folder. The directory structure should look similar to the following screenshot.

If it looks like this you’re all set to start Vagrant, if you don’t have the correct Vagrant file yet you can download it right here. Open a command prompt and browse to your folder and run the following command:
vagrant box add RedHat7 "../packer/redhat-7-2-x64-virtualbox.box"
This adds the box you just created to a predetermined folder of the VM you are using, in this case Virtualbox, changing this location is possible in Virtualbox. The fourth parameter is paramount, this tells vagrant how your box is called, notice that it is the same as the “config.vm.box” parameter in the Vagrant file. The fifth parameter is the location of the file Packer had as output. This command may take a while depending on the size of your previously build box.The next step is starting the Vagrant VM you have configured. The first time you run the following command it can take some time for it to complete depending on how much provisioning is done and how fast your machine is. In this tutorial it should run quite fast.
vagrant up
The VM will be booted earlier than Vagrant finishes its provisioning, it is recommended that you wait until Vagrant is done. For repeated use, your VM can be found in Virtualbox and you could also start it by running “vagrant up” again in your working directory.
If you somehow broke your VM or you want to start over with a fresh system you can simply type the following command:
vagrant destroy
After confirming you want to destroy your VM (this also kills a currently running VM) you can simply start over by typing “vagrant up”.
This concludes this tutorial about how to use Vagrant in combination with Packer. This tutorial only touches the surface of what is possible but it might give inspiration to experiment further. I hope following this tutorial was a fruitful experience and if there are any questions or suggestions feel free to leave them behind.