When setting up a continuous integration solution for Oracle SOA Suite code, it is best to work with mavenized projects, and thus rely on Oracle-provided maven plugins to do the tough job of compiling and deploying artifacts.
This way of working has been introduced by Oracle in the 12c range of products. There are no Maven plugins available for 11g Oracle products.
This post describes how to set up the plugin in a Binary Repository for Maven to be able to fetch it when the time has come to compile a SOA Composite.
Prerequisites:
- Installed software
- Maven
- Oracle SOA Suite (e.g. 12.1.3)
- Binary repository
- User + password
- Right to publish to repository
Binary Repository
The Oracle SOA Maven Plugin needs to be published to a Maven repository, this can be a local repository or a remote repository. Here, we’ll discuss a remote repository, as publishing to your local repository is similar and even easier!
Make sure your binary repository is set up, and you have a user and password with sufficient rights to add binaries to the repository.
Maven Settings
Edit your Maven Settings file, it is located at ~/.m2/settings.xml.
Make sure that you set up a profile, and that the profile/id matches activeProfiles/activeProfile. Also make sure that repository/id matches server/id for the credentials to be used when communicating to the server.
Combined, the settings.xml file would look something like this:
<settings>
  <profiles>
    <profile>
      <id>default</id>
      <repositories>
        <repository>
          <releases>
            <enabled>true</enabled>
            <updatePolicy>always</updatePolicy>
            <checksumPolicy>warn</checksumPolicy>
          </releases>
          <snapshots>
            <enabled>true</enabled>
            <updatePolicy>never</updatePolicy>
            <checksumPolicy>fail</checksumPolicy>
          </snapshots>
          <id>External</id>
          <name>Team External Repository</name>
          <url>https://repo.host/account/oracle-ext/</url>
          <layout>default</layout>
        </repository>
      </repositories>
    </profile>
  </profiles>
  <servers>
    <server>
      <id>External</id>
      <username>username</username>
      <password>password</password>
    </server>
  </servers>
  <activeProfiles>
    <activeProfile>default</activeProfile>
  </activeProfiles>
</settings>
Publishing the Maven Plugins
Oracle has created a Maven plugin to publish the Oracle SOA Maven Plugins to a Maven Repository. Oh yes they have!
It is called Oracle Maven Synchronization Plugin, and lives in all SOA Suite installations under $ORACLE_HOME/oracle_common/plugins/maven/com/oracle/maven/oracle-maven-sync/<version>.
To be able to work with this plugin, we first need to install it to our Maven instalation, after which we can use it to publish to any repository.
The easiest way for our usecase, is to add the Sync Plugin to our local Maven repository, after which we can invoke it to publish the correct artifacts to our remote repository.
Add Oracle Maven Synchronization Plugin to local repository
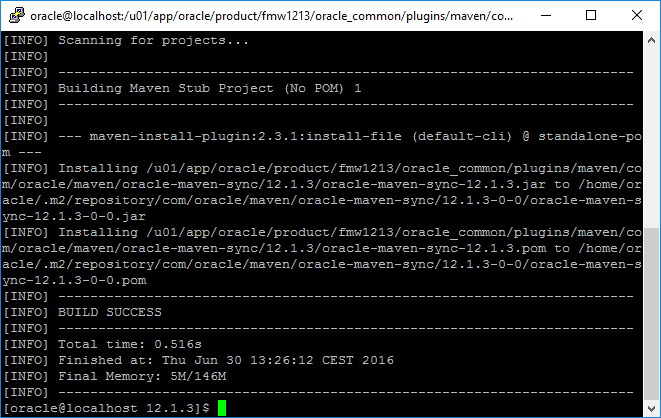
Navigate to the location of the Oracle Maven Synchronization Plugin of your SOA Suite installation of choice ($ORACLE_HOME/oracle_common/plugins/maven/com/oracle/maven/oracle-maven-sync/12.1.3/) and execute the following command:
mvn install:install-file -Dfile=oracle-maven-sync-12.1.3.jar -DpomFile=oracle-maven-sync-12.1.3.pom
It would show as:

Succes! You have now installed the Sync Plugin to your local Maven repo (which lives at ~/.m2/repository). Now for the next step: running the plugin.
Running the Oracle Maven Synchronization Plugin
The plugin takes 2 mandatory parameters as it’s input: oracleHome and serverId.
oracleHome is the location on disk where the Oracle Home for the Maven plugin you are trying to publish, and serverId is the name of the server you are publishing to as specified in your Maven settings.xml.
These need to be specified as Java properties: e.g. -DoracleHome=/u01/app/oracle/product/fmw1213.
My command, according to my local SOA Suite installation and settings.xml, is:
mvn com.oracle.maven:oracle-maven-sync:push -DoracleHome=/u01/app/oracle/product/fmw1213 -DserverId=External
Press enter, and it’ll connect to your Remote Repository, logs on as the user you have mentioned in your settings.xml, and uploads all artifacts. And that is a lot of data!
If you want to publish the plugins to your local Maven Repository, remove the -DserverId =External from your command and hit the return button. This will skip the communication to the external repository, and just install everything locally. Remember, this (by default) is in ~/.m2/repository, so make sure you have at least 500mb of free space over there.
Success!

Note: for the built in reference of what the sync-plugin does, try running:
mvn help:describe -Dplugin=com.oracle.maven:oracle-maven-sync -Ddetail