
Today we will continue our journey to build a fully operational CICD environment for home use. After setting up the artifact repository, we will add the orchestration. The Jenkins server will monitor the source repositories and launch our build jobs. We want our Jenkins server to be part of the Docker composition, so that we can easily start it.
This post is part of a series about creating a continues integration platform for home use.
Configure the artifact repository
First, we need to define a volume. Jenkins stores data on disk, and you don’t want it to be lost when the docker container is stopped. Add the volume in the docker-compose.yml volumes section, right after the nexus volume:
volumes:
  nexus-data:
  jenkins-data:
Next, we add Jenkins to the services section:
jenkins-master:
  image: jenkins/jenkins:2.129
  ports:
    - "8080:8080"
  expose:
    - "50000"
  volumes:
    - jenkins-data:/var/jenkins_home
- We use an explicit version of jenkins. Backward incompatible changes may happen if you do otherwise.
- We open the port 8080 to the outside world. This port is used to host the administration page of Jenkins server.
- We expose port 50000 in the internal network. This port will be used by the Jenkins slaves to connect to the master.
- The volume is mounted at the location /var/jenkins_home, which is the predefined data location of this docker image.
Prepare our host system
We want to access our Jenkins server on the url http://jenkins-master:8080. To make this work, we have to add it to our DNS, or we can simply add a mapping in the hostfile on our machine, which is perfectly acceptable for this local installation.
On linux, edit the file /etc/hosts
On windows, edit the file C:WindowsSystem32driversetchosts
Add the following line:
127.0.0.1 jenkins-master
This tells your computer that any traffic for jenkins-master will be routed towards the loopback ip number.
Start Jenkins Server for the first time
On the command-line, enter the docker-compose up command. All three containers in the composition will be started.
Once the services have started, we need to search the logging for the following information:
jenkins-master_1  | *************************************************************
jenkins-master_1  | *************************************************************
jenkins-master_1  | *************************************************************
jenkins-master_1  |
jenkins-master_1  | Jenkins initial setup is required. An admin user has been created and a password generated.
jenkins-master_1  | Please use the following password to proceed to installation:
jenkins-master_1  |
jenkins-master_1  | 3d3a06eaeea14f6e96f053228902dd66
jenkins-master_1  |
jenkins-master_1  | This may also be found at: /var/jenkins_home/secrets/initialAdminPassword
jenkins-master_1  |
jenkins-master_1  | *************************************************************
jenkins-master_1  | *************************************************************
jenkins-master_1  | *************************************************************
The above lines will only show as long as the initial setup has not been performed yet. They contain a secret key with which we can create our admin user. Copy the key for later use.
Create the administrator account
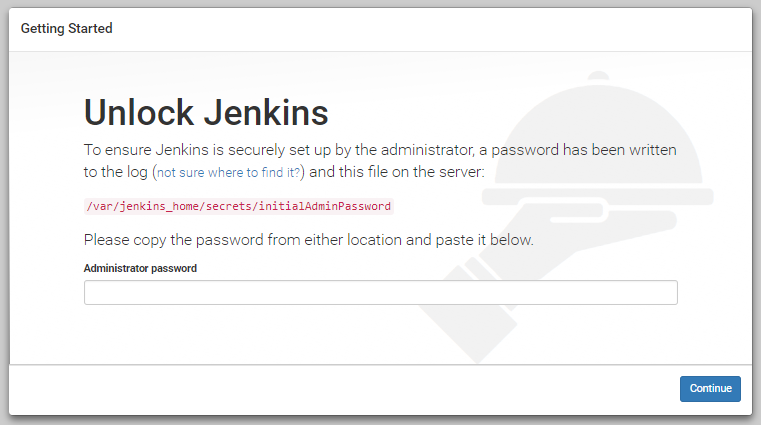
Open your browser and go to the Jenkins interface at http://localhost:8080. You will see an unlock screen like this:

Copy the key into the password field, and press Continue. You will be asked to select the plugins to install.

Select the suggested plugins, we can change them afterwards. You will see a progress screen showing the installation progress..

This may take a couple of minutes. After installing the pre-selected plugins, we will be asked to provide an Admin Account:

Create the user and press “Save”.

Set the Jenkins URL
Change the URL to http://jenkins-master:8080/ and select ”Save and Finish”. This is important, because Jenkins slaves will be accessing the master using this url.
Press ‘Start using Jenkins’ to complete the setup.
At this point you can log in to Jenkins, but if your browser-screen remains blank, do a clean stop and start again using docker-compose stop and docker-compose start.
You should get a screen like this, indicating that the installation was successful.

We now have a jenkins server ready to orchestrate jobs.
Go to the commandline on your machine and execute the following command to download the slave.jar file. We will need this file to create slaves for Jenkins to execute jobs.
wget http://jenkins-master:8080/jnlpJars/slave.jar
You could also use your browser to download the file. Keep the file for the next step: creating a jenkins worker.
Configure the master node to only execute jobs that are intended to be executed there, so that it will not be clogged by execute jobs that should run on slaves. Go to Configure > Nodes > Master

We are now ready to add a Jenkins slave to our setup, which we will do in the next post.
The post Jenkins server appeared first on BIT.