It´s high time to continue on our blog series about containerization. We’re gonna improve upon our previous setup and throw even more of our brews into containers. In fact the whole setup in this blogpost will be containerized.
We’ll start from the bottom up. First we’ll containerize our MySQL database (using a docker volume to persist the data), next we’ll improve a little upon our Spring Boot container and as an added bonus we’ll load balance the traffic to our application containers with the help of NGINX, which – needless to say – will be run in a container as well.
By the end of this blog we’ll roughly have the setup depicted in the figure below.

Along the way we’ll dive a lot in the Docker CLI and build some images using Docker files. The containers we’ll build and use in this blogpost can be pulled from Docker Hub, while the code of the three upper layers in the picture can be viewed on GitHub. See the references section for the links.
Network
First things first! In the old days of Docker one used links to connect containers, but they are a legacy feature now and should be avoided. Instead, you should use docker networks. So let’s create a network now:
docker network create tb-network-shared
That’s it! There’s not much more to it. If at any time you want to get an overview of the current network setup, you can use the docker inspect command:
docker network inspect tb-network-shared
Not much to see right now, except a name, a subnet and a gateway.
Note that the docker cli can help you autocomplete a lot of commands by using the <Tab> button.
Database layer
This time we’ll put the MySQL database in a proper container. Since containers are per definition stateless, should be immutable and should be replaceable on the fly, we need a way to persist the data so it survives a stopped container: enter Docker volumes!
Database volume
Creating a docker volume is as simple as creating a network. All you need is a name:
docker volume create tb-mysql-shared
A volume can also be inspected – with the docker volume inspect – command. It’ll give you the Mountpoint, i.e. the place on the host where the data of the volume is stored, in my case /var/lib/docker/volumes/tb-mysql-shared/_data.
Containerizing MySQL
In our previous blogpost we ran MySQL on the Docker Host. Here we’re gonna pull the official MySQL image from Docker Hub. For a good reference on how to set up a MySQL database in a docker container, you can check out this blogpost and this one.
For a first test run, spin up a MySQL container and initialize it with a user and a database:
docker run --name=test-mysql --detach
--env="MYSQL_ROOT_PASSWORD=root"
--env="MYSQL_USER=tb_admin"
--env="MYSQL_PASSWORD=tb_admin"
--env="MYSQL_DATABASE=db_terrax"
mysql
If all goes well, you’ll have a running MySQL container now. Let’s check out if the database and user has been created. First connect to the container and open a bash shell:
docker exec --tty --interactive test-mysql bash
You should get a root prompt now from where you can start a mysql client session:
mysql -utb_admin -ptb_admin
If the connection succeeds, it means the user tb_admin has been added successfully. Issue the following command to check if the db_terrax database has been created as well:
show databases;
If all went well, you should get the following result:

Let’s stop this container and move on:
docker stop test-mysql
Now for the Spring Boot container (next section) to be able to play well with the db_terrax database, the database should contain the necessary tables, i.e. beer and brewery.
So how do we get those tables in the database container? As it happens, MySQL provides an option for initializing a database: you can put an initialization script at a fixed location (/docker-entrypoint-initdb.d/). Upon startup of the container any script in there gets executed. Let’s build an image with a proper initialization script in place. I’ve put the source code (just a Dockerfile and the sql script) in GitHub.
The sql script just creates the beer and brewery tables – if not already present – joined by a foreign key:
create table if not exists brewery (
  id bigint not null auto_increment,
  country varchar(255),
  name varchar(255) not null,
  primary key (id)
) engine=InnoDB;

create table if not exists beer (
  id bigint not null auto_increment,
  beer_type varchar(255) not null,
  name varchar(255) not null,
  brewery_id bigint,
  primary key (id),
  FOREIGN KEY (brewery_id)
  REFERENCES brewery(id)
) engine=InnoDB;
The Dockerfile is as simple as can be. It just takes a base MySQL image (version 8.0.15) from Docker Hub, sets the environment variables to their proper values and copies the initialize script to its proper location:
FROM mysql:8.0.15
ENV MYSQL_ROOT_PASSWORD=root
  MYSQL_USER=tb_admin
  MYSQL_PASSWORD=tb_admin
  MYSQL_DATABASE=db_terrax
COPY ./create.sql /docker-entrypoint-initdb.d/create.sql
Let’s build the image and push it to Docker Hub. The tag version tb-docker-2.0 is a fixed version number we’ll be using for all of the images we build in this blogpost.
docker build --tag rphgoossens/tb-mysql-docker:tb-docker-2.0
docker push rphgoossens/tb-mysql-docker:tb-docker-2.0
Now we can startup a container (tb-mysql-db) for the image we’ve built and inspect it to see if our initialization script did its proper work:
docker run --name tb-mysql-db --detach
--network tb-network-shared
--mount source=tb-mysql-shared,target=/var/lib/mysql
rphgoossens/tb-mysql-docker:tb-docker-2.0
Note that we’re using the docker network and volume we created earlier here.
Now check the database again:
docker exec -it tb-mysql-db bash
Connect to the mysql client
mysql -utb_admin -ptb_admin
Connect to the db_terrax database and check its tables.
connect db_terrax;
show tables;
Now if all went well, you’ll see that the tables have been added to the database by the initialization script:

That’s it for the database layer! We now have a running mySQL container that’s ready for business (based on a proper base image). Now let’s see if we can let our Spring Boot application interact with it.
Spring Boot application
We’ll use the same Spring Boot application that we developed in our previous blog post with one slight adjustment: We’ll add the Spring Boot Actuator to the pom.xml
<dependency>
  <groupId>org.springframework.boot</groupId>
  <artifactId>spring-boot-starter-actuator</artifactId>
</dependency>
And we’ll expose the env endpoint of the actuator. With this we can check if our NGINX load balancer that we’ll add in the next section, is doing a proper job. Add the following to the application-docker.yaml file.:
management:
  endpoints:
    web:
      exposure:
        include: env
The final code can be found on GitHub.
Last step is building and pushing the new image to Docker Hub:
mvn clean install
mvn dockerfile:build
mvn dockerfile:push
Now spin up 2 containers on different ports and POST (use the swagger ui at http://localhost:809x/swagger-ui.html) some data to see if the connection with the mysql container works as expected (use two different publish ports, eg. 8091 and 8092).
docker run --name tb-springboot-app-x --detach
--network tb-network-shared
--publish 809x:8090
--env "SERVER_PORT=8090"
--env "DB_USERNAME=tb_admin"
--env "DB_PASSWORD=tb_admin"
--env "DB_URL=mysql://tb-mysql-db:3306/db_terrax"
rphgoossens/tb-springboot-docker:tb-docker-2.0
To check if the system survives a shutdown of the MySQL container and see if the data survives, stop and remove the container and spin up a new one:
docker stop tb-mysql-db
docker rm tb-mysql-db
docker run --name tb-mysql-db --detach
--network tb-network-shared
--mount source=tb-mysql-shared,target=/var/lib/mysql
rphgoossens/tb-mysql-docker:tb-docker-2.0
If you followed all the steps closely, the Spring Boot apps should work and a GET on the brewery resource should return the already persisted data.

NGINX load balancer
Now that we have multiple Spring Boot apps running on different ports, it’s time to put a load balancer in place. We’re gonna use NGINX for this. And just like we did in the MySQL section, we’re also gonna build a custom NGINX image and push it to Docker Hub.
The code for this project can be found at GitHub and like the MySQL image, it’s fairly simple. It’s just a docker file and a configuration file.
The Dockerfile’s main task is to load the configuration into the container (besides that, it also exposes the 8080 port and fires up NGINX):
FROM nginx:1.15.12
LABEL Roger Goossens
COPY nginx.conf /etc/nginx/nginx.conf
EXPOSE 8080
CMD ["nginx", "-g", "daemon off;"]
The NGINX configuration file can get pretty complex if you really wanna do fancy stuff with it. For a detailed description on the NGINX configuration, please go here. This is the one we’ll be using to build the image:
events { worker_connections 1024; }

http {
  upstream tb-springboot-app {
    server tb-springboot-app-1:8090;
    server tb-springboot-app-2:8090;
  }

  server {
    listen 8080;
    server_name localhost;

    location / {
      proxy_pass http://tb-springboot-app;
      proxy_set_header Host $http_host;
    }
  }
}
The server section takes care that the server will run on and listen to localhost:8080. The http://localhost:8080/ location will proxy requests to the upstream locations of both our Spring Boot application urls (taken care by the proxy_pass and corresponding upstream sections). The proxy_set_header directive ensures that the base URL of the Swagger UI that will be served by NGINX will have the proper value of http://localhost:8080, so all calls on the UI will be served by one of our two Spring Boot containers.
For now that should be enough information. Let’s build and push the image (it can be found on Docker Hub now):
docker build --tag rphgoossens/tb-nginx-docker:tb-docker-2.0 .
docker push rphgoossens/tb-nginx-docker:tb-docker-2.0
And finally spin up the last container based on this image:
docker run --detach
--network tb-network-shared
--publish 8080:8080
rphgoossens/tb-nginx-docker:tb-docker-2.0
Note that both Spring Boot containers need to be up so the corresponding upstream section in the NGINX configuration is valid. If one or both containers are down or running on different ports or with different names, the NGINX container won’t start and instead will throw an error (if someone knows a fix for this, please let me know!). After startup however, we can start shutting down Spring Boot containers without affecting the NGINX container.
After the NGINX container has been started, the Swagger UI will be available on http://localhost:8080/swagger-ui.html. You can play around with it and stop containers to see how it behaves. Shutting down one Spring Boot container won’t impact the system. The NGINX container will forward all concurrent requests to the one running container. If both Spring Boot containers are down, you’ll eventually get a 502 error.
One other way to inspect the load balancing is to check the environment via the Spring Boot Actuator. To query the HOSTNAME, enter: http://localhost:8080/actuator/env/HOSTNAME. If both containers are running, you’ll see that the HOSTNAME value will alternate between two values:
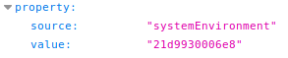

These values correspond to the hostname that can be found via the docker container inspect command:
![]()
Again, if you shut down one container and refresh, you’ll notice that the HOSTNAME will stick to the value of the one container that is still running.
Also of interest (we mentioned it earlier) is the docker network inspect command to get an overview of the entire network:
docker network inspect tb-network-shared
Clean up
After you played around enough and you want to clean up all the containers, networks, volumes and images on your system, first stop all running containers and then issue the following commands (note that this will remove every docker data on your system!):
docker system prune --volumes
docker image prune --all
Summary
We covered a lot of ground in this quite extensive blog post. We’ve shown how to create a multilayered application with all layers running in Docker containers. To quickly create the whole setup here’s a recap of all the statements needed to get the container constellation up and running:
docker volume create tb-mysql-shared
docker network create tb-network-shared
docker run --name tb-mysql-db --detach --network tb-network-shared --mount source=tb-mysql-shared,target=/var/lib/mysql rphgoossens/tb-mysql-docker:tb-docker-2.0
docker run --name tb-springboot-app-1 --detach --network tb-network-shared -e "SERVER_PORT=8090" -e "DB_USERNAME=tb_admin" -e "DB_PASSWORD=tb_admin" -e "DB_URL=mysql://tb-mysql-db:3306/db_terrax" rphgoossens/tb-springboot-docker:tb-docker-2.0
docker run --name tb-springboot-app-2 --detach --network tb-network-shared -e "SERVER_PORT=8090" -e "DB_USERNAME=tb_admin" -e "DB_PASSWORD=tb_admin" -e "DB_URL=mysql://tb-mysql-db:3306/db_terrax" rphgoossens/tb-springboot-docker:tb-docker-2.0
docker run --detach --network tb-network-shared --publish 8080:8080 rphgoossens/tb-nginx-docker:tb-docker-2.0
Note that we didn’t publish the Spring Boot app ports anymore. Since we’re using a docker network in all the containers, they can access each other’s ports and there’s no need to explicitly expose them. There’s also no need to publish the individual Spring Boot application ports because we want the NGINX load balancer to handle all the traffic and be the only gateway to our application.
Working with all these individual docker cli statements is cumbersome and luckily there is a better way to orchestrate such a container constellation, i.e. Docker Compose.
In our next (hopefully lot shorter) blog post, we’ll deep dive into Docker Compose and use it to rebuild the setup from this blog post in a much more manageable way.
Till then, stay tuned and grab another beer!!!
References
Source code and containers
- https://github.com/rphgoossens/tb-mysql-docker
- https://cloud.docker.com/repository/docker/rphgoossens/tb-mysql-docker
- https://github.com/rphgoossens/tb-springboot-docker
- https://cloud.docker.com/repository/docker/rphgoossens/tb-springboot-docker
- https://github.com/rphgoossens/tb-nginx-docker
- https://cloud.docker.com/repository/docker/rphgoossens/tb-nginx-docker
Other
- https://rphgoossens.wordpress.com/2019/02/27/delivering-crafts-in-containers-hellobeer-merges-with-terrax-micro-brewery-inc
- https://docs.docker.com/network/bridge
- https://docs.docker.com/storage/volumes
- https://severalnines.com/blog/mysql-docker-containers-understanding-basics
- http://blog.arungupta.me/docker-mysql-persistence
- https://www.nginx.com/products/nginx/load-balancing