

So lets say you’ve created a cool webapp, and now you are looking to deploy your app to a more permanent environment. For this you can use OCP (Openshift Container Platform) very easily. In short, Openshift is a PAAS solution which allows you to test, deploy and manage your application. All of this is based on containerization using the Kubernetes framework. If you are not familiar with OCP or Kubernetes I encourage you to dive a bit into these topics to understand some of the terms I will be using this post.
In OpenShift you can create entire pipelines for you entire application lifecycle. That is however beyond the scope of this post. In this post we will look at another feature to simply deploy our app using only its source code and S2I. To demonstrate I have created a demo “Tasks” app with a 3 tier architecture.
- A client side application created in Angular 4.
- An API layer using Spring Boot.
- A MongoDB database for data persistence.
You can find the sources for the frontend Angular App here and the sources for the java API here.
To get up and running you first need to get access to an OpenShift instance. The easy way would be to setup an account on Openshift Online. Here you can go for a free starter instance. Alternatively you can install minshift. If you have a Mac, and homebrew you can simply type:
brew cask install minishift
I will be writing the rest of this post based on the assumption you have installed minishift.
To login we need to start minshift:
minishift start
This will start the minishift instance and guide you on how to login. Go to the listed url and login using for example ‘developer/password’. By default the minishift instance allows you to login using any username and password. However the projects you create are only available to the user under which you have created them. You can setup and manage your app as well using a command line tool called ‘oc’. You can make the binary globally available or do this one-off by calling:
eval $(minishift oc-env)
Now you can call for example: “oc login -u system:admin” to login as admin or as developer using “oc login -u developer:password“.
Now that you’ve logged in (using the web console) its time to create a new project. Use the “New project” button to create a new project using the following properties:
Name: tasks
Display name: Tasks project
Description: Another great TODO application
Layer 1: Storage
Immediately you are asked to add something to your project. We are first going to add a MongoDB service to make sure we can persist our tasks. Click on the category “Data Stores” and select “MongoDB” (alternatively you can search for MongoDB directly). As for the defaults keep them that way but set the following properties:
username: dbuser
password: dbpassword
database name: test (I know, very descriptive)
After you’ve clicked on create you can return to the overview and witness the creation of the service and the first pod. This might take a few seconds, but if you see a blue circle, you’re good to go…

Layer 2: API
Lets create our backend api now by clicking “Add to project” in the top menubar. Select “s2i-java”. Call the service “backend” and enter the following git repo url: https://github.com/mhjmaas/tasks-be.git . Click on advanced and uncheck “Create a route to application”. (Because we don’t want the api to be publicly available). Accept the defaults and click on “Create”.
At this point Openshift will checkout the sources which we provided using the git url. It will then use the s2i-java image to get dependencies from maven repo’s and compile the sources. Then it will push the resulting docker image to its internal repository and use that image to setup a running backend pod. You can simply manually scale up or down by clicking the arrows next to the pod in the overview if you like.
Layer 3: Frontend
Time to setup the frontend. This will be run in a container which uses NGINX to host the Angular application. However there is no builder image for that available in the default Minishift environment. Therefore I have created one myself. There are various ways to get this s2i image. But by far the easiest way is to click “Add to project” in the top menubar, then select the tab “import yaml/json”. Here you can paste a json file containing a resource definition. Go to this url which is the git repo for the s2i-image. Copy the contents of the angular-s2i-nginx.json file and paste it in the “Import yaml/json” field. When you click on create it will download the image from docker hub and install it in your namespace.
Next step: create the frontend service. Once again, click “Add to project”, select “Uncategorized” and select “angular-s2i-nginx”. Provide the name “frontend”, and provide the git url https://github.com/mhjmaas/tasks-fe.git . Click on create.
Right now the s2i image will use the package.json file to checkout the correct dependencies from npm and then will build the application and publish to the local docker registry.

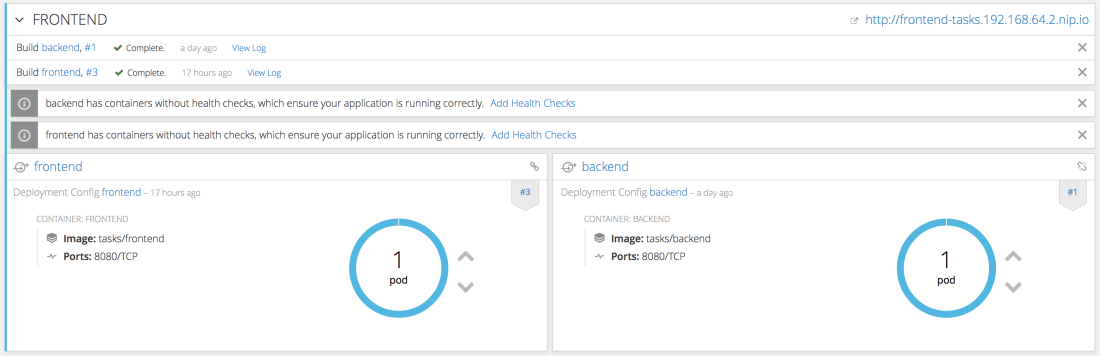
When the build is done, and the pod has been instantiated you can go to the displayed route in the top right of the frontend service. As you can see our app launches and you can add, update and delete tasks. Even if you refresh the page, stop and start the minishift instance your tasks will still be saved. Pretty awesome huh?
What is this dark magic?
Which is what you might be thinking right now… Lets clarify a number of things. First:
How do the pods communicate with each other?
Now this one is interesting. For the backend communication with the database this is quite simple. We have entered a username, password and database name when creating the persistent mongodb service. If you look at the application.properties file in the spring boot backend you can see it references these properties. The url of the database is in this case the service name: mongodb. So if you have changed this to something else you will have issues.
But what about the frontend’s communication with the api? Now this is based on two things. One: there is such thing as an internal hostname in the project you have created for the backend service. You can find it by going to “applications > services > backend”. Here you find the hostname: “backend.tasks.svc”. It will load-balance all incoming traffic over all pods of this service. This hostname is used in part two: NGINX reverse proxy. Have a look at the default.conf file in the tasks-fe repo. Here you see a reverse proxy configuration which uses the hostname we just found. Also this default.conf file is grouped together with a nginx.conf file in a folder “os3/conf”. This is a convention with the s2i-image needs to perform a bit of its magic. It will use the conf files in this folder to overwrite the default ones in the image when it is being created.
So there you have it…
A quick example of how to setup a full stack web app in OpenShift using various technologies in combination with builder images. Every time you push some changes to the git repository you can kick off another build and get running container as a result. If you use a webhook it even will be done fully automatic. Of course this is just the tip of the iceberg. You can add entire pipelines for lifecycle management of your app, add metrics, health checks and more. Feel feel to experiment a bit. I will be back explaining these features in more detail somewhere in the future.