
When working in a corporate environment, whether it is a commercial or non-commercial party, you’ll find restrictions apply to accessing the internet.
Very often, the servers hosted in such an environment are very tightly controlled and do not have internet access at all to keep things secure.
When you are working with publicly available Docker containers this sometimes becomes cumbersome, as you’ll have to revert to the age-old practice of sneakernetting to get the Docker images to your host.
In my case, things were even harder, as I also needed access to a (restricted) private repository by a third party. So what now?
Luckily, there are multiple products which can act like a proxy or ‘pull-through cache’ for Docker Registries, which is exactly what we need here. The machine hosting this proxy or cache needs internet access, and only that machine needs it. All other hosts in need of access to Docker Images can access the internet through this machine, which conveniently also caches the data so it only needs to be retrieved once to be distributed internally at a much faster pace.
Products like Sonatype Nexus, JFrog Artifactory and even Docker Registry can provide this exact functionality, and then some.
Here, I’ll use Sonatype Nexus to set this all up, mainly as this functionality is available in the OSS version (where Artifactory only provides it as part of their Pro-offering).
This post will show how to configure Nexus OSS to act as a pull-through cache for either the Docker Hub or a private repository, or a combination of them. It will also show how to configure the Docker clients to use your own cache when retrieving images.
Used software
- Sonatype Nexus OSS 3.13.0
- Docker 17.09 (and higher)
My setup consists of two Ubuntu LTS based VMs, one running a Docker container of Sonatype Nexus 3.13.0 (this machine is called docker-host), the other is running just Docker (and is called docker-client).
Please note that some networking-configuration might differ from your setup (e.g. IPs) but the method is the same. Also, please note that only the machine running Nexus OSS (docker-host) has access to the internet.
Configuring Nexus OSS
We are going to configure at least 3 things in Nexus, namely repositories and some security configuration.
Please note that this method should not be followed to the letter in a corporate environment as some performance considerations may apply,for instance to alter the Blobstore configuration.
Add Docker Proxy Repository for Docker Hub
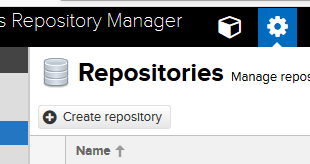
Log on to your Nexus instance with administrative rights, and navigate to the Admin pages. Click on Repository -> Repositories, and click on ‘Create repository’.

Select the ‘docker (proxy)’ recipe and start the configuration.

You’ll need to add your unique name to this Proxy, and make sure it is ‘Online’.
Since we are living our lives on the danger side, we’re not going to offer the V1 API on this Repository (Uncheck ‘Enable Docker V1 API’), but we’ll allow anonymous access.
This is actually quite important, so here it is again:
Uncheck ‘Force Basic Authentication’.
This will allow our Docker Clients to connect to our Repository without providing credentials. Which is the easiest method!
Punch in the following information under ‘Proxy’:
Remote storage: https://registry-1.docker.io
Docker Index: Use Docker Hub
All other configuration can be kept as-is.

Add Docker Proxy Repository for Private Repository (optional)
This is completely optional, and is showing you how to access a private repository in Docker Cloud.
Again, add a unique name, set it to ‘online’, disable V1 API, enable anonymous access, and punch in the following information under ‘Proxy’:
Remote storage: https://registry-1.docker.io
Docker Index: Use proxy registry
The difference is in the Authentication-part at the bottom of the page, where you have to put in the username and password able to access the required Docker Cloud private repository.
All other configuration can be kept as-is.

Add Group for Docker Repositories
A group is used to provide a single access point for multiple repositories. This is something you cannot achieve in Docker, as there’s only one place where the Docker CLient will look to when it tries to access the Docker Hub.
When we can make this single point to not only contain the Docker Hub but also everything else we want (e.g. private Docker Cloud repositories, our internally hosted Docker repositories, etc) all retrieval of Docker images can be handled transparently by Nexus, without the Client needing to know where to look for which image.
A Repository Group is just a collection of Repositories, but we need to enable our Docker Client to connect to it.
Add a unique name, set it to ‘online’, disable V1 API and enable anonymous access.
We need to configure a Repository COnnector, which is basically an endpoint where the Repository Group serves its contents. I chose port 8181 (as Nexus runs on 8081 by default) and only configured HTTP as I’m too lazy to get HTTPS configured correctly. 
You’ll need to select the Docker Repositories (either a hosted repo or a proxy or even another group) as Members of this Group that are required, and save the configuration.
All other configuration can be kept as-is.

Configure security settings
In order for the anonymous access to our repositories to work correctly, we’ll need to add the ‘Docker Bearer Token Realm’ to the Active Realms in Nexus.
To do this, navigate to Administration -> Security -> Realms and select the Realm in the list of ‘Available’ Realms. Click the right-pointing arrow and Save.

All done!
Configuring Docker Client
Now with our Nexus instance configured correctly, we’ll need to make sure our Docker Client is trying to resolve all Docker Images from there, instead of via the internet.
This requires us to modify the Docker Client Daemon, specifically by instructing it to look at Nexus as it is the registry-mirror. Also, as it runs on HTTP instead of HTTPS we’ll need Docker to understand that it is OK and it can look there.
As user root, make or edit the following file: /etc/docker/daemon.json
{
        "insecure-registries": ["10.0.2.2:8181"],
        "registry-mirrors": ["http://10.0.2.2:8181"]
}
Please note that this will probably be quite different in your setup, as I’m running VM’s. This IP is the IP of my HOST computer, where portmapping handles VM1 trying to resolve something on VM2.
You can safely replace 10.0.2.2 with your hostname or IP if needed. Please replace all occurances.
After this file is saved, Docker needs to be restarted. If successfull: the command docker info should show the following:

Insecure Registries:
 10.0.2.2:8181
 127.0.0.0/8
Registry Mirrors:
 http://10.0.2.2:8181/
All done!
Now you’ll be able to pull from Nexus without the need for your Docker Client to have access to the internet.
docker pull mysql

It should show up in Nexus in your Docker Group Repository, where you’ll see the cached blobs, tags and manifests.


