
Introduction
First a short background about WS-Addressing (Web Service Addressing, WS-A). WS-Addressing is a transport mechanism to address messages for web service. It defines header elements (To, Action, MessageID) to identify the endpoint. See for more information: https://www.w3.org/Submission/ws-addressing/.
TIBCO ActiveMatrix BusinessWorks does not natively support WS- Addressing in version 6. However, there is a workaround available that requires some work. This blog will be your guide through the workaround. Compared to version BW5 the SOAP service invocation is also different so that means that workaround for version. The workaround involves modifying the concrete WSDL with header elements and adding some schemas to define their content.
Add schemas
Retrieve definitions
We need to retrieve the official type definitions for the WS-A elements that need to be added to the SOAP header.
Go to : https://www.w3.org/2006/03/addressing/ws-addr.xsd and download the xsd. The best way to do this is to view the source of the webpage and save as ‘ws-addr.xsd’ on your system.
Import the schema in your BW Project.
WS-Element schema
Download and import attached wsaElements.xsd. This schema contains the WS-Addressing elements in an complex type. We will use this schema later by referring to this Type in the Service reference.
Modify WSDL
The WSDL need to be updated with the WS-Addressing element to be able to use them in the SOAP Invoke activity.
- Add import to the ws-addr.xsd to be able to refer to the types.
Add:
<wsdl:import location=”../Schemas/ws-addr.xsd” namespace=”http://www.w3.org/2005/08/addressing”></wsdl:import>
Usually the WSDL will be in the Service Descriptors folder in your BW Project and the schemas in the folder on the same level.
- Create a message type called ‘wsaMessage’. We will use this message in the WSDL Operation. The wsaMessage can look like this:
<wsdl:message name=”wsaMessage”>
<wsdl:part element=”wsa:MessageID” name=”messageID”/>
<wsdl:part element=”wsa:RelatesTo” name=”relatesTo”/>
<wsdl:part element=”wsa:Action” name=”action”/>
<wsdl:part element=”wsa:To” name=”to”/>
<wsdl:part element=”wsa:From” name=”from”/>
</wsdl:message>
Add a reference to parts of the wsaMessage in the operation. In the WSDL binding section add a soap12:header element. It will then look similar to the example below:
<wsdl:operation name=”SendMessage”>
<soap12:operation soapAction=”SendMessage” style=”document”/>
<wsdl:input>
<soap12:header message=”tns:wsaMessage” part=”action” use=”literal”/>
<soap12:body use=”literal”/>
</wsdl:input>
<wsdl:output>
<soap12:body use=”literal”/>
</wsdl:output>
</wsdl:operation>
In the example only the Action WS-A part is added but you can add all the types you need from the wsaMessage.
Be sure to save the WSDL and reload it in the BW Studio.
Update Reference, Bindings and Context
Update Reference
We need to update the Service Reference with the wsaElements in order to be able to use them as parameters.
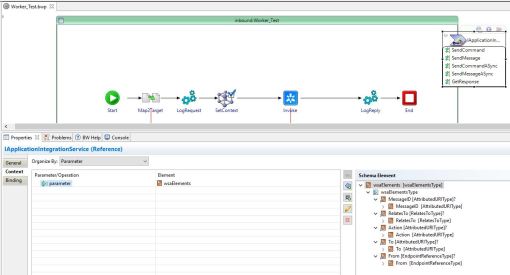
Go to Reference -> Context Tab -> Add Input Context Parameter -> and refer to the wsaElements complex type from wsaElements.xsd . See image below:

Update Binding
If you are already in the Service Reference -> Go to Bindings tab. This tab contains the Binding and operations. Click the Operation and go to Context Mappings -> Request Context. Select the parameters you need and map them to the Headers/wsaMessage elements. In the example only wsaMessage.action is mapped, see below:

If not all elements are visible at the right side, please check the WSDL. If the parameter element in the Data Source is not visible refer to the previous step. Validate the schema and WSDL to make suer that all references are correctly.
Update Context
Now the last step is to add a mapping in the TIBCO process to be able to give the wsaElements a value. This is slightly different compared to BW5, because in BW6 there is no SOAPrequestReply activity in which you should have been able to mapp the Header fields directly.
Go to the Palette Library and select Basic Activities. Add ‘SetContext’ activity before the Invoke and mapp the Input. Be aware that you need to select the same operation in the General tab as in the Invoke activity afterwards.
Test
Before running a test make sure that the logging for the soap communication is activated.
Go to the log settings (usually C:/tibco/bw/6.4/config/design/logback/logback.xml). Update the SOAP Binding logger to level DEBUG. It will now show the entire SOAP message including headers and namespaces.
After restating the Debugger you are now able to see the header fields from the invocation in the console logs. It will show after com.tibco.bw.binding.soap ‘Client Request Message is :’.
Good luck!