Working with a managed Kubernetes solution like OpenShift is really a mixed bag of emotions. It’s a great blessing as a lot of the regular infrastructure like hosts, scaling, load balancing, network stuff, and user management is managed by the platform and in extension by you, but it also imposes some constraints and an added complexity in managing your applications.
Suddenly, you’re not logging into hosts anymore but are administering them through a web-based console. Everything should be stateless, and where are my logs going?!
The use of Jenkins is quite nicely integrated into the ‘legacy’ version of OpenShift, 3.x. We are running 3.11(.146).
Setting up a Jenkins instance in your OpenShift Namespace is quite literally as easy as pointing to a Jenkins Pipeline in your Version Control System, and ‘everything’ happens by itself!
A fresh instance of Jenkins is provisioned, the referenced Pipeline is loaded, and you can even click a shiny button ‘Start Pipeline’ from OpenShift. Logging in to Jenkins is done through SSO via OpenShift and all should be well.
But is it?
Often it is.
But sometimes, you need more.
For instance: when you want to run a Jenkins agent node with some very specific tooling.
As worker nodes (agents) for Jenkins are usually separate hosts with a specific toolchain, this will not work out of the box with the automatically provisioned Jenkins.
There’s always the option of manually spinning up instances of your container of choice and configure the container to be a Jenkins Agent. You’ll also need to edit the Jenkins config to accept this container as an Agent node and hope you touched on all the important configuration settings.
I’m not saying it cannot be done, it is just a lot of work. Also: manually maintaining runtime config is laborious and must be redone when migrating the config to other namespaces or when something is accidentally deleted (e.g. your namespace is emptied by an overzealous coworker).
Everything-as-code
Configuration is part of ‘everything’ and thus should be code.
Conveniently, there is a Jenkins Plugin to aid us here: Jenkins Kubernetes.
This plugin enables us to run Agent pods directly on our Kubernetes cluster (i.e. OpenShift), and more importantly, define this Agent based on an image without configuring something in Jenkins itself. Everything is automagically loaded in Jenkins if one is to add some configuration files to the OpenShift namespace. Yay!
Jenkins is notoriously heavy on XML, and this is no exception. Time to load some XML into yaml on OpenShift!
As everything should be as code, it is time to create OpenShift configuration files containing the Jenkins configuration, pointing to the image we are trying to create containers from, to run our software the way we want it.
Luckily, the process is pretty straightforward. Let’s start!
Identify the custom Jenkins Agent image
Red Hat conveniently provides the Container section in the Red Hat Ecosystem Catalog. The images suited to be used as agents can be found by searching for ‘jenkins’ and are usually named jenkins-agent-*.
Here, we want to run a Java11 based Maven agent on OpenShift 3, so openshift3/jenkins-agent-maven-36-rhel7 is the image of our choice.
Jenkins plugin configuration
At its heart, the configuration looks something like this:
<org.csanchez.jenkins.plugins.kubernetes.PodTemplate>
  <inheritFrom></inheritFrom>
  <name>java11-maven</name>
  <instanceCap>2147483647</instanceCap>
  <idleMinutes>0</idleMinutes>
  <label>java11-maven</label>
  <serviceAccount>jenkins</serviceAccount>
  <nodeSelector>beta.kubernetes.io/os=linux</nodeSelector>
  <volumes/>
  <containers>
    <org.csanchez.jenkins.plugins.kubernetes.ContainerTemplate>
      <name>jnlp</name>
      <image>registry.redhat.io/openshift3/jenkins-agent-maven-36-rhel7</image>
      <privileged>false</privileged>
      <alwaysPullImage>true</alwaysPullImage>
      <workingDir>/tmp</workingDir>
      <command></command>
      <args>${computer.jnlpmac} ${computer.name}</args>
      <ttyEnabled>false</ttyEnabled>
      <resourceRequestCpu></resourceRequestCpu>
      <resourceRequestMemory></resourceRequestMemory>
      <resourceLimitCpu></resourceLimitCpu>
      <resourceLimitMemory></resourceLimitMemory>
      <envVars/>
    </org.csanchez.jenkins.plugins.kubernetes.ContainerTemplate>
  </containers>
  <envVars/>
  <annotations/>
  <imagePullSecrets/>
  <nodeProperties/>
</org.csanchez.jenkins.plugins.kubernetes.PodTemplate>
Please note the important stuff here: (and I know it’s a lot of XML for just a small config, but bear with me)
name, label, nodeSelector and image.
With name, you can set the name of the ContainerTemplate in the Jenkins GUI. A little bit more important is label. This is how you can ‘select’ a ContainerTemplate from within a Jenkins pipeline. The nodeSelector is to help OpenShift figure out on which nodes the container can be run on (here, we want to use Linux-based nodes) and with image you pinpoint the specific RedHat Jenkins Agent image you previously selected from the repository.
Making Jenkins load the config
The Jenkins Plugin responsible for running workers on OpenShift automatically loads extra PodTemplates from *any* ConfigMap with certain labels. This has to be the label role=jenkins-slave.
As OpenShift only deals with yamls, one would create an OpenShift yaml like below:
apiVersion: v1
data:
  template1: "<org.csanchez.jenkins.plugins.kubernetes.PodTemplate>\r\n      <inheritFrom></inheritFrom>\r\n      <name>java11-maven</name>\r\n      <instanceCap>2147483647</instanceCap>\r\n      <idleMinutes>0</idleMinutes>\r\n      <label>java11-maven</label>\r\n      <serviceAccount>jenkins</serviceAccount>\r\n      <nodeSelector>beta.kubernetes.io/os=linux</nodeSelector>\r\n      <volumes/>\r\n      <containers>\r\n        <org.csanchez.jenkins.plugins.kubernetes.ContainerTemplate>\r\n          <name>jnlp</name>\r\n          <image>registry.redhat.io/openshift3/jenkins-agent-maven-36-rhel7</image>\r\n          <privileged>false</privileged>\r\n          <alwaysPullImage>true</alwaysPullImage>\r\n          <workingDir>/tmp</workingDir>\r\n          <command></command>\r\n          <args>${computer.jnlpmac} ${computer.name}</args>\r\n          <ttyEnabled>false</ttyEnabled>\r\n          <resourceRequestCpu></resourceRequestCpu>\r\n          <resourceRequestMemory></resourceRequestMemory>\r\n          <resourceLimitCpu></resourceLimitCpu>\r\n          <resourceLimitMemory></resourceLimitMemory>\r\n          <envVars/>\r\n        </org.csanchez.jenkins.plugins.kubernetes.ContainerTemplate>\r\n      </containers>\r\n      <envVars/>\r\n      <annotations/>\r\n      <imagePullSecrets/>\r\n      <nodeProperties/>\r\n    </org.csanchez.jenkins.plugins.kubernetes.PodTemplate>"
kind: ConfigMap
metadata:
  labels:
    role: jenkins-slave
  name: jenkins-slave
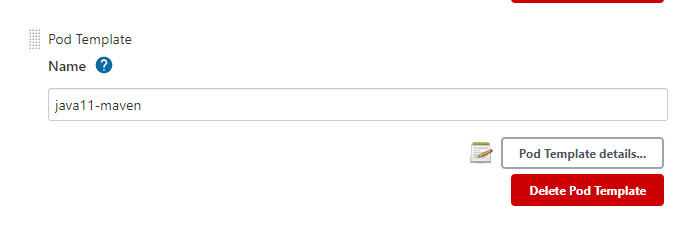
The next time Jenkins loads (e.g. when you delete the current pod!) this ConfigMap is picked up automatically, and Jenkins presents you with this glorious result:
Manage -> Nodes -> Configure Clouds -> Kubernetes -> Pod Templates:
Using the Jenkins Agent image in your Pipeline
As mentioned before, once the PodTemplate is loaded into Jenkins, it can be referenced just like any other ‘agent’ in your Pipeline.
stage('Build & Unit test') {
    agent {
        label 'java11-maven'
    }
    environment {
        VERSION = sh script: 'mvn help:evaluate -Dexpression=project.version -q -DforceStdout', returnStdout: true
    }
    steps {
        echo "Building & testing version ${VERSION}"
        sh "export JAVA_HOME=/etc/alternatives/java_sdk_11 && mvn verify"
    }
}
Conclusion
Extending the number of use cases for an embedded instance of Jenkins on your OpenShift namespace, is very valuable for teams to operate independently and create software the way the team wants to. With strictly adhering to the everything-as-code adage, by creating config for a fully hands-off provisioned Jenkins instance, it is just another tool for successful teams to be even more successful with the scarce resources they have.