
In this post, we will create a simple Jenkins slave image, capable of compiling Java code. We will register it in the Jenkins master instance that we created during the previous blog post.
We will take a docker image that holds a java environment. On top of that, we will deploy the Jenkins slave binary. It needs to be configured to connect to the master. Finally we add the software to execute the jobs it is required to do.
Remember the microservice principle: make small containers that can do one job well, not one large container that can do everything.
This post is part of a series about creating a continues integration platform for home use.
Configure the artifact repository
Register the Jenkins slave
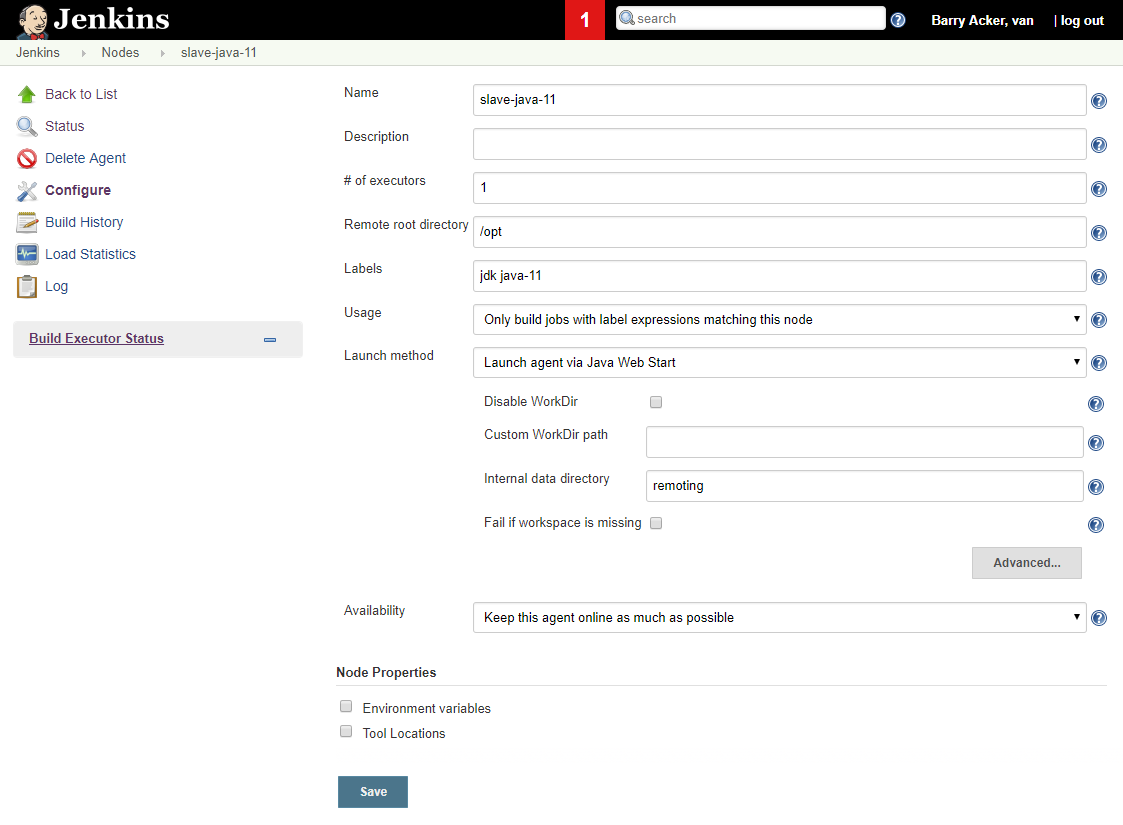
We need to register every new slave in Jenkins before it can connect. Go to ‘Manage Jenkins’, ‘Manage Nodes’ and add a ‘New Node’. Provide the default settings like in the picture below:

Save your configuration. You will get a confirmation screen below. It contains one critical piece of information: the secret key needed to connect the slave to Jenkins. Copy the secret key. We will need it in our slave image.

Building the Jenkins slave
Go to your docker-compose folder, and create a new subfolder called ‘slave-java-11’. Copy the slave.jar file which you downloaded in the jenkins master setup blogpost into this folder. Create three files: a Dockerfile and two script files: setup.sh and wait-for-it.sh If you are working on windows, make sure the line-endings of the script files are in Unix mode, or you will get errors during runtime. Copy-paste the content from below:
Dockerfile
FROM openjdk:11

COPY slave.jar .
COPY wait-for-it.sh .
COPY startup.sh .
RUN chmod u+x startup.sh wait-for-it.sh

ENV JENKINS_MASTER_SERVER=jenkins-master
ENV JENKINS_MASTER_PORT=8080
ENV JENKINS_MASTER_JNLP_PORT=50000
ENV SLAVE_NAME=slave-java-11
ENV JENKINS_TOKEN=b26ad819e8d4f823302e1ea4abd724e488967130b7910ea7762c4579c80852ee

CMD ["sh", "./startup.sh"]
You can replace the jenkins_token with the secret key you copied from the slave screen above, but it is not necessary, we will override it in the docker-compose file.
The dockerfile defines a new image based upon the official openjdk image. This image gives us the build tools we are looking for, but conveniently also includes a java runtime that allows us to execute slave.jar. It adds the files from our build folder, so that we can use them inside the image, and assign correct execution rights to the scripts. Finally it sets the defaults for the environment variables. This is more for understanding the image, as we will override the values in docker-compose later on.
startup.sh
The startup.sh script will be called upon execution of the docker image. We first check if the two Jenkins ports are available, to avoid busy waiting with a lot of spam in the log file. When the ports are available, we start the slave process.
#!/usr/bin/sh

bash ./wait-for-it.sh ${JENKINS_MASTER_SERVER}:${JENKINS_MASTER_PORT} -t 300
bash ./wait-for-it.sh ${JENKINS_MASTER_SERVER}:${JENKINS_MASTER_JNLP_PORT} -t 300

java -jar slave.jar -jnlpUrl http://${JENKINS_MASTER_SERVER}:${JENKINS_MASTER_PORT}/computer/${SLAVE_NAME}/slave-agent.jnlp -secret ${JENKINS_TOKEN} -workDir /opt
wait-for-it.sh
We use a wait script from github [under The MIT License] to wait for the availability of a tcp port on the network before we start the slave.
#!/usr/bin/bash
#   Use this script to test if a given TCP host/port are available

cmdname=$(basename $0)

echoerr() { if [[ $QUIET -ne 1 ]]; then echo "$@" 1>&2; fi }

usage()
{
    cat << USAGE >&2
Usage:
    $cmdname host:port [-s] [-t timeout] [-- command args]
    -h HOST | --host=HOST       Host or IP under test
    -p PORT | --port=PORT       TCP port under test
                                Alternatively, you specify the host and port as host:port
    -s | --strict               Only execute subcommand if the test succeeds
    -q | --quiet                Don't output any status messages
    -t TIMEOUT | --timeout=TIMEOUT
                                Timeout in seconds, zero for no timeout
    -- COMMAND ARGS             Execute command with args after the test finishes
USAGE
    exit 1
}

wait_for()
{
    if [[ $TIMEOUT -gt 0 ]]; then
        echoerr "$cmdname: waiting $TIMEOUT seconds for $HOST:$PORT"
    else
        echoerr "$cmdname: waiting for $HOST:$PORT without a timeout"
    fi
    start_ts=$(date +%s)
    while :
    do
        if [[ $ISBUSY -eq 1 ]]; then
            nc -z $HOST $PORT
            result=$?
        else
            (echo > /dev/tcp/$HOST/$PORT) >/dev/null 2>&1
            result=$?
        fi
        if [[ $result -eq 0 ]]; then
            end_ts=$(date +%s)
            echoerr "$cmdname: $HOST:$PORT is available after $((end_ts - start_ts)) seconds"
            break
        fi
        sleep 1
    done
    return $result
}

wait_for_wrapper()
{
    # In order to support SIGINT during timeout: http://unix.stackexchange.com/a/57692
    if [[ $QUIET -eq 1 ]]; then
        timeout $BUSYTIMEFLAG $TIMEOUT $0 --quiet --child --host=$HOST --port=$PORT --timeout=$TIMEOUT &
    else
        timeout $BUSYTIMEFLAG $TIMEOUT $0 --child --host=$HOST --port=$PORT --timeout=$TIMEOUT &
    fi
    PID=$!
    trap "kill -INT -$PID" INT
    wait $PID
    RESULT=$?
    if [[ $RESULT -ne 0 ]]; then
        echoerr "$cmdname: timeout occurred after waiting $TIMEOUT seconds for $HOST:$PORT"
    fi
    return $RESULT
}

# process arguments
while [[ $# -gt 0 ]]
do
    case "$1" in
        *:* )
        hostport=(${1//:/ })
        HOST=${hostport[0]}
        PORT=${hostport[1]}
        shift 1
        ;;
        --child)
        CHILD=1
        shift 1
        ;;
        -q | --quiet)
        QUIET=1
        shift 1
        ;;
        -s | --strict)
        STRICT=1
        shift 1
        ;;
        -h)
        HOST="$2"
        if [[ $HOST == "" ]]; then break; fi
        shift 2
        ;;
        --host=*)
        HOST="${1#*=}"
        shift 1
        ;;
        -p)
        PORT="$2"
        if [[ $PORT == "" ]]; then break; fi
        shift 2
        ;;
        --port=*)
        PORT="${1#*=}"
        shift 1
        ;;
        -t)
        TIMEOUT="$2"
        if [[ $TIMEOUT == "" ]]; then break; fi
        shift 2
        ;;
        --timeout=*)
        TIMEOUT="${1#*=}"
        shift 1
        ;;
        --)
        shift
        CLI=("$@")
        break
        ;;
        --help)
        usage
        ;;
        *)
        echoerr "Unknown argument: $1"
        usage
        ;;
    esac
done

if [[ "$HOST" == "" || "$PORT" == "" ]]; then
    echoerr "Error: you need to provide a host and port to test."
    usage
fi

TIMEOUT=${TIMEOUT:-15}
STRICT=${STRICT:-0}
CHILD=${CHILD:-0}
QUIET=${QUIET:-0}

# check to see if timeout is from busybox?
# check to see if timeout is from busybox?
TIMEOUT_PATH=$(realpath $(which timeout))
if [[ $TIMEOUT_PATH =~ "busybox" ]]; then
        ISBUSY=1
        BUSYTIMEFLAG="-t"
else
        ISBUSY=0
        BUSYTIMEFLAG=""
fi

if [[ $CHILD -gt 0 ]]; then
    wait_for
    RESULT=$?
    exit $RESULT
else
    if [[ $TIMEOUT -gt 0 ]]; then
        wait_for_wrapper
        RESULT=$?
    else
        wait_for
        RESULT=$?
    fi
fi

if [[ $CLI != "" ]]; then
    if [[ $RESULT -ne 0 && $STRICT -eq 1 ]]; then
        echoerr "$cmdname: strict mode, refusing to execute subprocess"
        exit $RESULT
    fi
    exec "${CLI[@]}"
else
    exit $RESULT
fi
The scriptfile above is on top of the depends_on statement in the docker compose file. Depends_on only waits untill the dockerfile has begun executing, but the depending image may be started before the depends_on image is actually ready to receive connections. It is beter to wait untill the ports are available, so that our connection attempts will at least reach the process.
Your folder structure should now look like this:
cicd/
  reverse/
    certs/
      ...
    Dockerfile
    https.conf
  slave-java-11/
    slave.jar
    Dockerfile
    startup.sh
    wait-for-it.sh
  docker-compose.yml
Edit the docker-compose.yml file and add a service for the slave:
slave-java-11:
    build: slave-java-11
    environment:
      - JENKINS_MASTER_SERVER=jenkins-master
      - JENKINS_MASTER_PORT=8080
      - JENKINS_MASTER_JNLP_PORT=50000
      - JENKINS_TOKEN=86f28fafeeb1f4500d546f1957df26718a14fbca244605ea5762da9ad2f721e8
      - SLAVE_NAME=slave-java-11
    depends_on:
      - jenkins-master
This is where we will paste the secret key we copied on the slave screen above. Replace the jenkins_token value 86f28fafeeb1f4500d546f1957df26718a14fbca244605ea5762da9ad2f721e8 with your copy.
Execute the command docker-compose up in the main folder to build the slave image and start the composition.
The slave should show up as an active node in Jenkins master.

Active Jenkins Nodes
This concludes this post. In the next post, I will go into the configuration of the slave node by creating a sample workflow.
The post Adding a Jenkins Slave appeared first on BIT.