
SoapUI and HermesJMS can be used to test a SOAP-over-JMS service using TIBCO EMS. It does need some configuration.
Open HermesJMS and create a new session:

A new window opens. Firs, the JMS provider (EMS) has to be configured. Go to the Providers tab, right-click Classpath Groups and select Add Group. Give it a name, for example EMS_Group, click OK. Now, richt-click Library and select Add JAR(s). Browse to the lib folder in <EMS_HOME> (c:tibcoems8.1lib) and select all JARs. Press Open and scan for JMS connection factories.
Go to tab Sessions and select the new Group as Loader:

Choose Connection Factory Class com.tibco.tibjms.TibjmsConnectionFactory. Add 3 properties (userName, userPassword and serverURL) tot the Connection Factory by right-clicking in the Property pane and selecting Add property. Configure these properties. In Plug In, select Tibco EMS and also add 3 properties (username, password and serverURL) and configure these. Now, the session should look like this:

Press OK. Select the new session and press the Discover queues and topics button (or right-click the session and select Discover).
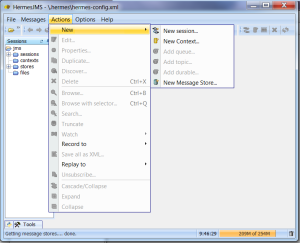
One last thing for HermesJMS, save the settings (File/Save Settings). You can now exit HermesJMS.
In Windows, the HermesJMS configuration (hermes-config.xml) is located at folder C:.hermes.
In SoapUI, create a SOAP Project. Select the new project and change the Hermes Config:

Create a new endpoint like jms://<SessionName>::queue_<QueueName> (for example jms://TIBCO_EMS::queue_Q.GETORDERS.ORDERSERVICE). Now, add the Soap Action to the JMS Headers by checking Add SoapAction as property:

If you want to use a temporary reply queue, add ::queue_ at the end of the endpoint (jms://TIBCO_EMS::queue_Q.GETORDERS.ORDERSERVICE::queue_). Now, you’re ready to go testing.