
1 Introduction
A dominant factor that affects the performance of TIBCO Administrator for BusinessWorks 5 (observed in version 5.9.1) is whether the domain data is stored in files or in a database. It is expensive to store all domain data in files, because the saving of the files (I/O) and in-memory copies take time. Therefore, activities in the TIBCO Administrator could cause java heap space errors in the TIBCO Administrator. This could be observed in the administrator logs in
/<TIBCO_HOME>/tra/domain/<DOMAIN_NAME>/logs/Administrator.log
“java.lang.OutOfMemoryError: Java heap space”
In the “Tuning Guide for TIBCO Administrator” it is recommended to use a database for domain data storage. When using a database only changes in the data are written, which improves the performance. In this blog post I will explain how to migrate from file based to database based domain data storage on a Microsoft Windows machine.
2 Export domain data and backup tra files
First, we want to store the current domain data (the EAR files and settings), since it is assumed that the TIBCO Administrator domain already exists with a file based domain data. The easiest way to do this is by using AppManage to export the whole domain. This will save all deployed ear files and their configuration in a local folder. Run a command window and go to AppManage, it is placed in
/<TIBCO_HOME>/tra/<VERSION>/bin
Export deployed EAR files and configuration xml files by using the following command:
AppManage -batchExport -domain <DOMAIN_NAME> -user <USERNAME> -pw <PASSWORD> -dir C:tempexport
This will export all deployed EAR files and configuration xml files to my local folder ‘export’.
Make sure you do not use your /<TIBCO_HOME>/tra/domain/<DOMAIN_NAME> folder, because this will be removed when migrating the domain. Secondly, it is wise to make a backup of the important tra files. Possibly, you would like to create the new domain with the same setting. Save a copy of the following tra files on your file system:
/<TIBCO_HOME>/tra/domain/<DOMAIN_NAME>/hawkagent_<DOMAIN_NAME>.tra
/<TIBCO_HOME>/administrator/domain/<DOMAIN_NAME>/bin/tibcoadmin_<DOMAIN_NAME>.tra
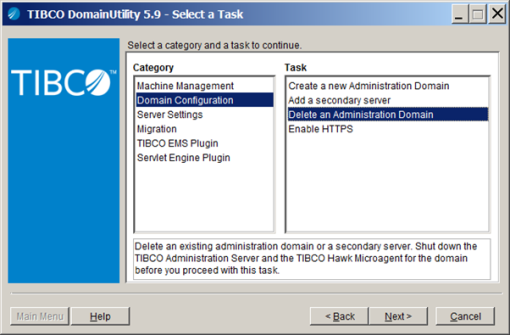
3 Delete Administrator Domain
First, stop the TIBCO Administrator and TIBCO Hawk services for the domain from the services panel in Windows. Second, to delete an Administrator Domain, run the TIBCO Domain Utility. The utility GUI can be found in:
/<TIBCO_HOME>/tra/<VERSION>/bin/domainutility.exe
Select Domain Configuration > Delete an Administrator Domain (see picture). Follow the steps and provide Administrator credentials. Validate that the domain data is removed from the folders that have been backed up in step 2 above.

If more than one machine belongs to the domain, you must first remove each machine from the domain or your environment will be inconsistent.
4 Create Database
Use a Database management tool to create a database. For instance Microsoft SQL Server Management Studio. Make sure to create a database and an account for the TIBCO Administrator. You may choose a name of your liking for the database and the TIBCO Administrator. Save the credentials, you will need them later. It is also important that the TIBCO Administrator DB user has all the necessary grants in the created database. It should have insert rights, a simple solution is to connect it to the default dbo schema.
5 Create Administrator Domain
Run the TIBCO Domain Utility again. Select Domain Configuration > Create a new Administrator Domain. Supply the Administrator Domain Name, this can be the same name as before. In the section below select Domain information stored in a Database (see picture).

On the next page provide tomcat details, followed by the administrator details on the next page. Provide the database configuration information and test the connection.
Also set the values for minimum and maximum connections. When your application starts up, it initializes the minimum number of connections to the database. Higher settings are better for application instances, but may have adverse results in the rest of the system. The correct setting is whatever the complete system can handle on a sustained basis without taxing other system resources.
Click next and follow the steps to create the domain services.
6 Recreate tra files and deploy domain data
Before starting the domain services it can be useful to copy the saved settings or tra files from step 2 above to the following folders.
/<TIBCO_HOME>/tra/domain/<DOMAIN_NAME>/hawkagent_<DOMAIN_NAME>.tra
/<TIBCO_HOME>/administrator/domain/<DOMAIN_NAME>/bin/tibcoadmin_<DOMAIN_NAME>.tra
Now the TIBCO Administrator and TIBCO Hawk services for the new domain can be started from the services panel in windows. With AppManage the whole domain data can be (re-)deployed. This will deploy all ear files and their configuration. Run a command window and go to AppManage, it is placed in
/<TIBCO_HOME>/tra/<VERSION>/bin
Deploy EAR files and configuration xml files by using the following command:
AppManage -batchDeploy -domain <DOMAIN_NAME> -user <USERNAME> -pw <PASSWORD> -dir C:tempexport [-nostart ]
The option -nostart could be added to deploy all ear files without starting them. This is advised since it will use all the memory for deploying instead of deploy and start at the same time. If it is necessary to start all the adapters it could be done with AppManage
-batchStart after deployment or by selecting all service instances from the Administrator GUI and start them.