HelloBeerTM recently got some complaints from the Alcoholics Anonymous community. As it turns out, it’s very difficult to order a fine collection of craft beers online without ones wife finding out about it. Browser histories were scanned and some particularly resourceful spouses even installed HTTP sniffers to confront their husbands with their drinking problem. So in order to keep on top of the beer selling game, HelloBeer needs an obscure backdoor where orders can be placed lest it risks losing an important part of its clientele.
One of HelloBeer’s founding fathers has an old server residing in the attic of his spacious condo. He suggested to use that guy to serve as an old school FTPS server where customers can upload their orders to without their wives finding out about it.
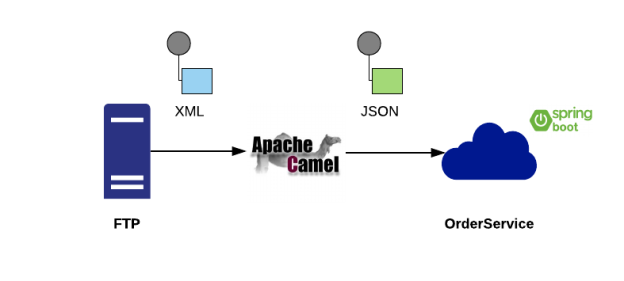
In this blogpost we’re gonna build the integration between an FTPS server and our OrderService REST API (implemented in Spring Boot). To build the integration we’ll be relying on Apache Camel. It’s a great way for embedding Enterprise Integration Patterns in a Java based application, it’s lightweight and it’s very easy to use. Camel also plays nicely with Spring Boot as this blogpost will show.

To keep our non-hipster customers on board (and to make this blogpost a little more interesting), the order files placed on the FTP server, will be in plain old XML and hence have to be transformed to JSON. Now that we have a plan, let’s get to work!
Oh and as always, the finished code has been published on GitHub here.
Installing FTP
I’m gonna build the whole contraption on my Ubuntu-based laptop and I’m gonna use vsftpd to acts as an FTPS server. As a first prototype I’m gonna make the setup as simple as possible and allow anonymous users to connect and do everything they shouldn’t be able to do in any serious production environment.
These are the settings I had to tweak in the vsftpd.conf file after default installation:
# Enable any form of FTP write command.
write_enable=YES
# Allow anonymous FTP? (Disabled by default).
anonymous_enable=YES
# Allow the anonymous FTP user to upload files.
anon_upload_enable=YES
# Files PUT by anonymous users will be GETable
anon_umask=022
# Allow the anonymous FTP user to move files
anon_other_write_enable=YES
Also make sure the permissions on the directory where the orders will be PUT are non-restrictive enough:
Contents of /srv directory:

Contents of /srv/ftp directory:

Contents of /srv/ftp/hello-beer directory:

The .done and .error directories are where the files will be moved to after processing.
Spring Booting the OrderService
The OrderService implementation is just plain old Spring Boot. For a good tutorial, check one of my previous blog posts here. The REST controller exposes a GET method for retrieving a list of orders and a POST method for adding a new order:
@RestController
@RequestMapping("/hello-camel/1.0")
public class OrderController {

    private final OrderRepository orderRepository;

    @Autowired
    public OrderController(OrderRepository orderRepository) {
        this.orderRepository = orderRepository;
    }

    @RequestMapping(value = "/order", method = RequestMethod.POST, produces = "application/json")
    public Order saveOrder(@RequestBody Order order) {
        return orderRepository.save(order);
    }

    @RequestMapping(value = "/orders", method = RequestMethod.GET, produces = "application/json")
    public List<Order> getAllOrders() {
        return orderRepository.findAll();
    }
}
Most of the heavy lifting is done in the domain classes. I wanted the Order to be one coherent entity including its Order Items, so I’m using a bidirectional OneToMany relationship here. To get this guy to play nicely along with the REST controller and the generated Swagger APIs by springfox-swagger2 plugin I had to annotate the living daylights out of the entities. I consulted a lot of tutorials to finally get the configuration right. Please check the references section for some background material. These are the finalized classes that worked for me (please note that I’ve omitted the getters and the setters for brevity):
The Order class:
@Entity
@Table(name = "hb_order")
public class Order {
    @Id
    @GeneratedValue(strategy = GenerationType.AUTO)
    @ApiModelProperty(readOnly = true)
    @JsonProperty(access = JsonProperty.Access.READ_ONLY)
    private Long id;

    @NotNull
    private Long customerId;

    @OneToMany(
        mappedBy = "order",
        cascade = CascadeType.ALL,
        orphanRemoval = true)
    @JsonManagedReference
    private List<OrderItem> orderItems;
}
The ApiModelProperty is used by the generated Swagger definitions and takes care that the id field only pops up in the response messages of the GET and POST methods, not in the POST request message (since the id is generated). The JsonProperty takes care that no id fields sent to the API aren’t unmarshalled from the JSON message to the entity POJO instance. In the OneToMany annotation the mappedBy attribute is crucial for the bidirectional setup to work properly (again: check the references!). The JsonManagedReference annotation is needed to avoid circular reference errors. It goes hand in hand with the JsonBackReference annotation on the Order Item (stay tuned!).
The OrderItem class:
@Entity
@Table(name = "hb_order_item")
public class OrderItem {
    @Id
    @GeneratedValue(strategy = GenerationType.AUTO)
    @JsonProperty(access = JsonProperty.Access.READ_ONLY)
    @ApiModelProperty(readOnly = true)
    private Long id;

    @ManyToOne(fetch = FetchType.LAZY, cascade = CascadeType.ALL)
    @JoinColumn(name = "order_id")
    @JsonBackReference
    private Order order;

    @NotNull
    private Long inventoryItemId;

    @NotNull
    private Long quantity;
}
Again here the id field is made read-only for the API and for the Swagger definition. The ManyToOne and JoinColumn annotations are key to properly implement the bidirectional OneToMany relationship between the Order and OrderItem. And equally key is the JsonBackReference annotation on the Order field. Without this guy (and its corresponding JsonManagedReference annotation on the Order.orderItems field) you get errors when trying to POST a new Order (one last time: check the references!).
The rest of the code is available on the aforementioned GitHub location. If you give it a spin, you can check out the API on the Swagger page (http://localhost:8080/swagger-ui.html) and test it a bit. You should be able to POST and GET orders to and from the in-memory database.
Camelling out the integration
Now that we have a working OrderService running, let’s see if we can build a flow from the FTP server to the OrderService using Camel.
First step is adding the necessary dependencies to our pom.xml:
<dependency>
    <groupId>org.apache.camel</groupId>
    <artifactId>camel-spring-boot-starter</artifactId>
    <version>${camel.version}</version>
</dependency>
<dependency>
    <groupId>org.apache.camel</groupId>
    <artifactId>camel-core-starter</artifactId>
    <version>${camel.version}</version>
</dependency>
<dependency>
    <groupId>org.apache.camel</groupId>
    <artifactId>camel-ftp-starter</artifactId>
    <version>${camel.version}</version>
</dependency>
<dependency>
    <groupId>org.apache.camel</groupId>
    <artifactId>camel-jacksonxml-starter</artifactId>
    <version>${camel.version}</version>
</dependency>
<dependency>
    <groupId>org.apache.camel</groupId>
    <artifactId>camel-jackson-starter</artifactId>
    <version>${camel.version}</version>
</dependency>
<dependency>
    <groupId>org.apache.camel</groupId>
    <artifactId>camel-http-starter</artifactId>
    <version>${camel.version}</version>
</dependency>
The camel-spring-boot-starter is needed when you’re gonna work with camel in a Spring Boot application. For the other dependencies. It’s not that different from building a non-Spring Boot Camel application. For every camel component you need, you have to add the necessary dependency. The big difference is that you use the corresponding dependency with the -starter suffix.
Alright so what are all these dependencies needed for:
- camel-core-starter: used for core functionality, you basically always need this guy;
- camel-ftp-starter: contains the ftp component;
- camel-jacksonxml-starter: used to unmarshal the XML in the Order to our Order POJO;
- camel-jackson-starter: used to marshal the Order POJO to JSON;
- camel-http-starter: used to issue a POST request to the OrderController REST API.
Believe it or not, now the only thing we have to take care of is to build our small Camel integration component utilizing all these dependencies:
@Component
public class FtpOrderToOrderController extends RouteBuilder {

    @Override
    public void configure() throws Exception {

    JacksonDataFormat jacksonDataFormat = new JacksonDataFormat();
    jacksonDataFormat.setInclude("NON_NULL");
    jacksonDataFormat.setPrettyPrint(true);

    from("ftp://localhost/hello-beer?username=anonymous&move=.done&moveFailed=.error")
        .log("${body}")
        .unmarshal().jacksonxml(Order.class)
        .marshal(jacksonDataFormat)
        .log("${body}")
        .setHeader(Exchange.HTTP_METHOD, constant("POST"))
        .to("http://localhost:8080/hello-camel/1.0/order");
    }
}
Some pointers to the above code:
- The .done and .error directories are where successfully and unsuccessfully processed Orders end up. If you don’t take care of moving the orders, they will be processed again and again;
- The NON_NULL clause added to the JacksonDataFormat, filters out the id fields when marshalling the POJO to JSON;
- The XML and JSON will be logged so you can verify that the transformations are working as expected.
The rest of the route imho is self-explanatory.
Oh and one more thing. I like my XML elements to be capitalized. So our Order XML element contains a CustomerId element, not a customerId element. This only works is you give the jacksonxml mapper some hint in the form of annotations on the Order (and OrderItem) POJO (note that I’ve omitted the other annotations in the code below):
public class Order {

    private Long id;

    @JacksonXmlProperty(localName="CustomerId")
    private Long customerId;

    @JacksonXmlProperty(localName="OrderItems")
    private List<OrderItem> orderItems;
}
The same applies for the OrderItem, see Github for the definitive code.
Testing the beasty
Now as always the proof is in the tasting of the beer. Time to fire up the Spring Boot application and place our first Order on the FTP server.
I’ve created a small newOrder.xml file and put it in a local directory. It looks like this:
<?xml version="1.0" encoding="UTF-8" ?>
<Order>
    <CustomerId>1</CustomerId>
    <OrderItems>
        <OrderItem>
            <InventoryItemId>1</InventoryItemId>
            <Quantity>100</Quantity>
        </OrderItem>
        <OrderItem>
            <InventoryItemId>2</InventoryItemId>
            <Quantity>50</Quantity>
        </OrderItem>
    </OrderItems>
</Order>
Now when i connect to my local FTP server, change to the hello-beer directory and issue a PUT of that local newOrder.xml file, I can see the logging of the Camel component appearing in my IntelliJ IDE:

As you can see the first log statement has been executed and the XML content of the file is displayed. The second log statement has been executed as well and nicely displays the message body after it has been transformed into JSON.
You will also notice that the file has been moved to the .done directory. You can also do this test with an invalid xml file and notice that it ends up in the .error directory.
One last test needed. Let’s issue a GET against the hello-camel/1.0/orders endpoint with the help of the Swagger UI. And lo and behold the response:

Great, so our newOrder.xml that arrived on our FTP server has been nicely stored in our database. Our first prototype is working. Our AA customers will be delighted to hear this.
Summary
In this blog post we’ve seen how easy it is to integrate with Apache Camel in a Spring Boot application. We coded an FTP-to-REST integration flow in no time and even put some XML-to-JSON transformation into the mix. I like the fact that we can keep the integration code nice and clean and separated from the rest of the application.
Testing is still a bit of trial and error though. Let’s see if we can put some proper unit tests in place in the next blog post. For now: happy drinking!
References
- https://help.ubuntu.com/lts/serverguide/ftp-server.html.en
- http://manpages.ubuntu.com/manpages/bionic/man5/vsftpd.conf.5.html
- https://rphgoossens.wordpress.com/2018/01/20/putting-spring-boot-to-rest-with-swagger-and-grab-a-beer-in-the-process/
- https://vladmihalcea.com/the-best-way-to-map-a-onetomany-association-with-jpa-and-hibernate/
- https://www.baeldung.com/jackson-bidirectional-relationships-and-infinite-recursion
- https://www.callicoder.com/hibernate-spring-boot-jpa-one-to-many-mapping-example/
- https://www.thoughts-on-java.org/best-practices-many-one-one-many-associations-mappings/
- http://camel.apache.org/spring-boot.html
- http://camel.apache.org/camel-core.html
- http://camel.apache.org/ftp.html
- http://camel.apache.org/jackson-xml.html
- http://camel.apache.org/json.html
- http://camel.apache.org/http.html