
There are many ways to deploy and maintain software, some better than other, most of them are conventient the way you like to use them.
Sometimes it doesn’t matter how you do it.
It is your own VM, your rules, no messy environments, let’s do some Docker, yeeeaahh.
Installing Docker
In case you have not installed Docker yet, or struggling with the sudo docker thing, here’s a set of commands that worked on my VM which is Ubuntu 18.04
sudo apt update
sudo apt install docker.io
sudo usermod -a -G docker $USER
sudo adduser $USER docker
newgrp docker
sudo systemctl restart docker
docker info
The Dockerfile
The next step is creating a Dockerfile.
Why would you start from scratch if somebody has done it before?
Exactly for this reason I went looking for the simplest EMS Docker I could find.
It’s a GitHub page
https://github.com/unravellingtechnologies/docker-tibco-ems/blob/master/Dockerfile
The author is https://github.com/unravellingtechnologies
Clone the GitHub page, or create a Dockerfile using something such as:
mkdir -p ~/docker
mkdir -p ~/docker/ems
gedit ~/docker/ems/Dockerfile
The next step is checking your EMS version and change it in the Dockerfile
ENV EMS_VERSION 8.3

ENV EMS_VERSION 8.4.0

ENV EMS_VERSION 7.1
Optional: Installing a dummy EMS
Having trouble getting EMS to work, haven’t installed it yet or don’t want garbage? Then use this link to create a /tibco link to /tmp which cleans itself upon reboot.
sudo ln -s /tmp/tibco /tibco
Install EMS using properties as displayed in the config file, meaning:
- TIBCO_HOME: /tibco
- EMS CONFIG: /tibco/config/tibemsd.json
- admin / no password
EMS
Next step is adding the TIBCO EMS tarball, where 8.4.0 is the version I am using, yours might be different. It is important that this folder is the installed version of EMS (containing bin and lib), not the installer itself (containing ./TIBCOUniverstal-installer.bin).
It is also important for the Dockerfile that the root folder of your tar, is ems.
If not, you need to change this line in your Dockerfile:
ENTRYPOINT /tibco/(optional: ems)/$EMS_VERSION/bin/tibemsd64 -config $EMS_CONFIG
cd such as /tibco
tar -cvf 8.4.0.tar.gz ./ems
mv 8.4.0.tar.gz ~/docker/tibco/ems/8.4.0
cd ~/docker/ems/
Configuration
The last step is adding the config which is in the /config dir on the GitHub page
tibemsd.json
You should also have a config dir in your docker folder, if not cloned, create it
mkdir -p ~/docker/ems/config
gedit ~/docker/ems/config/tibemsd.json
You could change some users, ports, password etcetera, but why would you do that on your own little DEV VM.
Checklist
- Dockerfile
- TIBCO EMS .tar.gz
- tibemsd.json
Building the box
cd ~/docker/ems
docker build -t ems:8.4.0 ./
Next thing is try to run it
docker run -p 7222:7222 ems:8.4.0
You could run in detch mode using docker run -d -p or -dit -p, -it stands for interactive, not sure where the logging goes if you don’t use -it and log to console.
Stopping the docker is quite easy.
Run docker stop , usually the first 3-5 digits are fine if you have only a few docker boxes running.

Forget the id? run docker ps
Want some awk? here it is:
docker stop $(docker ps | grep "ems" | awk '{print $1}')

docker stop $(docker ps | grep "7222" | awk '{print $1}')
Scripting, making it too easy
Now, sometimes you forget the docker commands, the quotes in awk or you are just lazy?
Let’s make a script.
Run gedit and add the following script to /usr/local/bin
Bold items need to be fixed by you!
sudo gedit /usr/local/bin/ems
#!/bin/sh
usagetext="build, start , stop , restart . port=each port is a seperate EMS instance"

if [ $# -eq 0 ]
then
echo "usage=$usagetext"
fi

if [ "$1" = "build" ]; then
cd /home/$USER/docker/tibco/ems/8.4.0
docker build --tag ems:8.4.0 ./
fi

if [ "$1" = "start" ]; then
docker run --cpus=4 -dit --cpuset-cpus=0 --memory="700m" -p "$2":7222 ems:8.4.0
fi

if [ "$1" = "stop" ]; then
docker stop $(docker ps | grep "$2" | awk '{print $1}')
fi

if [ "$1" = "restart" ]; then
docker stop $(docker ps | grep "$2" | awk '{print $1}')
docker run --cpus=4 -dit --cpuset-cpus=0 --memory="700m" -p "$2":7222 ems:8.4.0
fi
now make the script executable and owned by you
sudo chmod a+x /usr/local/bin/ems

sudo chown <strong>$USER</strong>:<strong>$USER</strong> /usr/local/bin/ems
Success
That’s it, you should be done now.
Try it out by running:
ems start 7222
That’s it.
Multiple services
ems build

ems start 7222

ems start 7223

ems start 8005

ems restart 7222
hacking yourself a system service
The last thing you could do, is start EMS as a Linux systemd service (systemctl)
Put the following in sudo vi /etc/systemd/system/ems.service
[Unit]
Description=ems-8.4.0
After=docker.service
Requires=docker.service

[Service]
#Type=forking
#User=docker
Group=docker

ExecStart=/usr/bin/docker run --cpus=4 -dit --cpuset-cpus=0 --memory="700m" -p 7222:7222 ems:8.4.0
ExecStop=/usr/bin/docker ps | grep 7222| awk '{print $1}' | xargs docker stop
Restart=always

[Install]
WantedBy=multi-user.target
Close the vi and enable the service file
sudo systemctl daemon-reload
sudo systemctl enable ems.service
sudo systemctl start ems.service
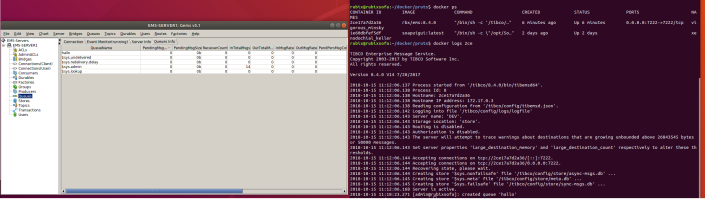
now if we start the service, use Gems to create a queue, and check docker logs we see we can create a queue.

Well, that’s it. I hope you see the ease of Docker.