Java is well-known for its portability. Wherever the Java Virtual Machine (JVM) runs, your code also runs.
However, in some instances one might need to call code that’s natively compiled.
This could be to interact with a native library, to handle hardware or maybe even to improve performance for an intensive process.
There are many reasons why one might consider doing this. While I have not used this technology in any meaningful way, it is being used in real-world scenarios. For example, Google uses it in parts of Android, namely for Bluetooth.
The Java Development Kit (JDK) provides a method called Java Native Interface (JNI) to bridge the gap between the byte code running in the JVM and whatever native code you need to interact with.
What are we going to do?
We are going to write a simple C++ library that uses JNI, import it into a Java application and call the native functions from that library within our Java program. Quite simple really, or is it?
So. How does it work?
First things first, the native code has to be loaded into the JVM as a shared library.
To keep it simple, a shared library is an external file that contains native code that is loaded into a program on startup so that the program may call its methods.
You might have seen these files before. On Windows machines they have the “.dll” extension and on Linux they have the “.so” extension.
In this article we create a simple shared library and show how to call it from your Java program.
What is needed?
– Java
– C/C++ compiler (gcc)
– CMake
Step 1: Java
Create a Java project as you would normally.
Next, load the library through a static block. This ensures that the library is be loaded if it can be found.
Keep in mind that since the program is trying to load the library file in a static block, it won’t be able to start without it.
Alternatively, the shared library can be loaded anywhere in our program but this is my preferred method as it ensures that the library is loaded if the program started successfully.
@SpringBootApplication
public class JniArticleApplication implements CommandLineRunner {
    static {
        final String userDirectory = System.getProperty("user.dir"); // This gets the current working directory. This is the current directory the application is running in.
        final String sharedLibsDirName = "sharedlibs"; // The directory where our shared library is stored
        final String sharedLibraryName = System.mapLibraryName("my_native_library"); // This maps the library name to the platform specific name. On MacOS, this is mapped to libmy_native_library.dylib

        // The program is not going to start if it cannot find the library
        System.load(Paths.get(userDirectory, sharedLibsDirName,sharedLibraryName).toString());
    }
}
Next, create two new classes. One that houses the native methods and one that is going to be used as a data class.
First, create the data class as it’s the easiest. In the example, a simple class is used that holds a name.
public class MyDataObject {
    private String name;

    public String getName() {
        return name;
    }

    public void setName(String name) {
        this.name = name;
    }
}
Next, create a class that houses the native methods.
public class MyNativeObject {
    public native void printToStdOut();
    public native int addNumbers(int number1, int number2);
    public native void manipulateData(MyDataObject dataObject);
}
The methods in this class looks familiar to something most Java programmers are already know, abstract methods.
Instead of the “abstract” keyword, the “native” keyword is used, and this is where the magic begins.
The next section describes how to prepare the C++ code.
Step 2: Preparing the C++ code
The javac command is used to generate header files from Java code that has the “native” keyword.
This brings us one step closer to gluing the Java and C++ together.
For those who do not know what a C/C++ header file is. Keeping it simple, it is a file that contains declarations of functions and types that are later implemented in source files (.cpp files).
To incorporate this into the build process, adding the following under the plugin section in the Maven POM.

Now we run a build and we should see the “cpp” folder in our project. In that folder we should find a generated header file.
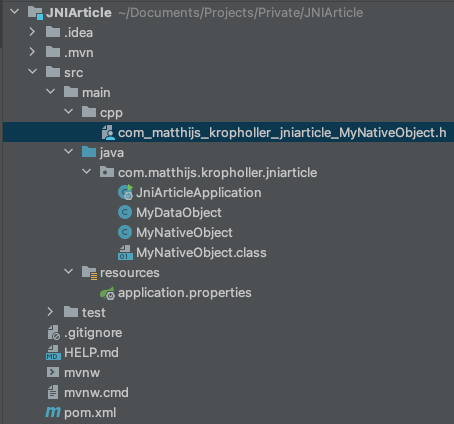
When this file is opened we will see the following:
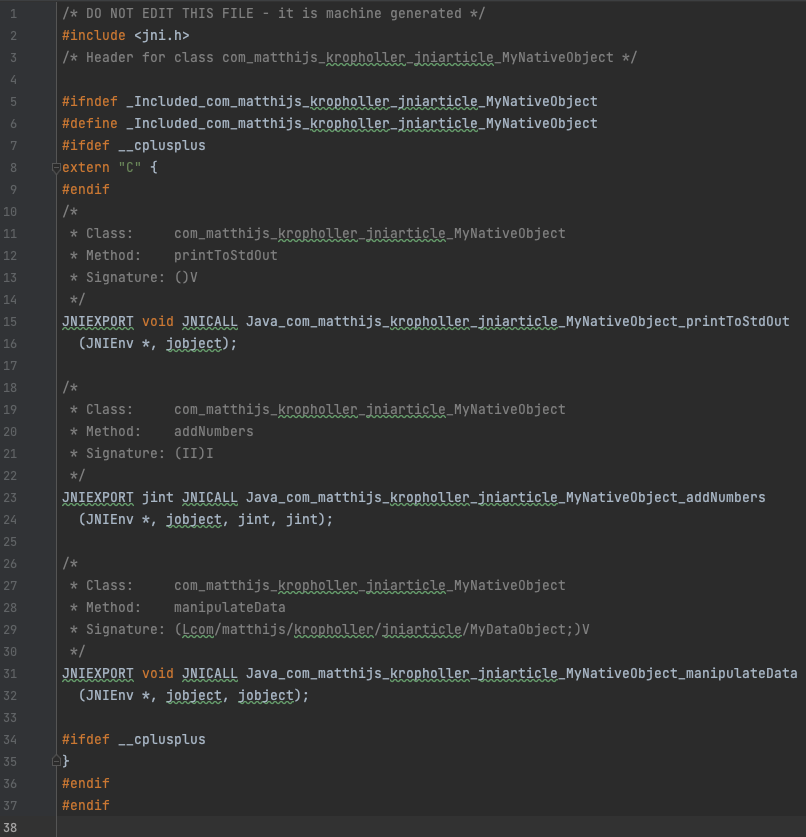
Javac automatically generated functions based on the methods that are qualified as “native” earlier, incorporating the class it belongs to and the package name into the name of the function.
Looking closer at the generated functions you can see a few things that might look weird at first glance.
Our integers got turned into “jint”. Why do all our functions have “JNIEnv*” and “jobject” even if the original Java function did not have any arguments?
More confusingly, what does “JNIEXPORT” and “JNICALL” even mean?
Let’s start with the ones that are the easiest to explain, “jint” and “jobject”. The “jint” is a C/C++ representation of a Java integer type.
“jobject” is similar but for a Java object instead. The first “jobject” argument you see in a function represents the object itself.
Now for the ones that are a little bit more complicated to explain. JNIEnv* is a pointer to the Java Native Interface environment.
This JNIEnv* pointer allows for interaction with Java. It makes it possible to access methods of objects, initialize new objects, etc.
“JNIEXPORT” and “JNICALL” provide information that JNI needs to call the functions. JNIEXPORT ensures that the function is be placed on the functions table so that JNI can find it.
JNICALL ensures that the exported function is available to JNI so that it can be called from within our Java application.
All of these types and compiler macros come from the “jni.h” header file which can seen at the top of the generated header file.
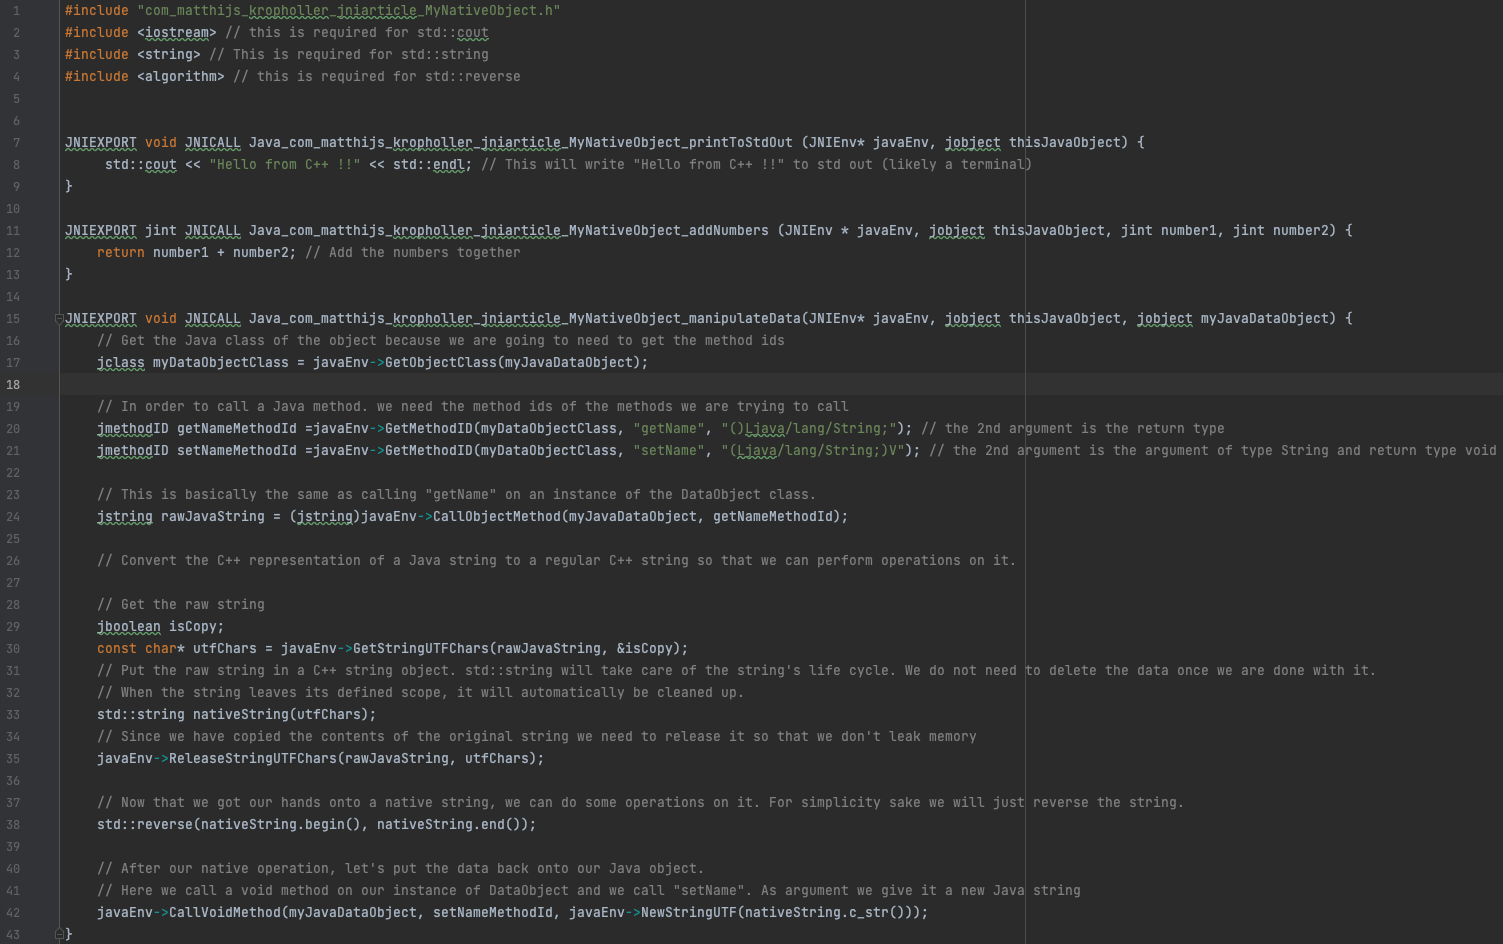
Now all we have is a header file. Let’s create a .cpp file to implement the generated header.
Create a .cpp file, preferably with the name same as our generated .h file in the src/main/cpp folder.
In my case this is com_matthijs_kropholler_jniarticle_MyNativeObject.cpp.
Next, implement the C++ methods.
Step 3: Compiling our C++ code
The generated header has been implemented and is ready for compilation. This can be done by hand. One would need to manually compile the C++ code and link it together.
This can be done through scripting, like Bash scripting for example but this might be hard to manage long term. Luckily, CMake exists, which seeks to remedy this problem as it will generate the files needed to compile and glue the native code together.
CMake is quite popular in the C/C++ world, and for good reason too. One of CMake’s main advantages is that it generates platform specific makefiles and that it’s compatible with a multitude of compilers.
In our cpp folder, where the C++ code resides, create a new file called CMakeLists.txt. This file contains our CMake instructions.
cmake_minimum_required(VERSION 3.20)
project(my_native_library)

# Set C++ 17 as teh standard
set(CMAKE_CXX_STANDARD 17)

# Print our JAVA_HOME in the console when we run CMake to help identifying problems with our java home.
message(STATUS "JAVA_HOME= $ENV{JAVA_HOME}")
message(STATUS "")

# Next we set some variables that the JNI package needs to load in
# Here is how its done on MacOS and Linux

# If Linux
if(UNIX AND NOT APPLE)
    set(JAVA_AWT_LIBRARY "$ENV{JAVA_HOME}/lib/libjawt.so")
    set(JAVA_JVM_LIBRARY "$ENV{JAVA_HOME}/lib/server/libjvm.so")
    set(JAVA_INCLUDE_PATH2 "$ENV{JAVA_HOME}/include/linux")
endif()

# if MacOS
if(UNIX AND APPLE)
    set(JAVA_AWT_LIBRARY "$ENV{JAVA_HOME}/lib/libjawt.dylib")
    set(JAVA_JVM_LIBRARY "$ENV{JAVA_HOME}/lib/server/libjvm.dylib")
    set(JAVA_INCLUDE_PATH2 "$ENV{JAVA_HOME}/include/darwin")
endif()

set(JAVA_INCLUDE_PATH "$ENV{JAVA_HOME}/include")
set(JAVA_AWT_INCLUDE_PATH "$ENV{JAVA_HOME}/include")

# While running CMake, this will create a folder called "sharedlibs" in the root of our project.
file(MAKE_DIRECTORY "${CMAKE_SOURCE_DIR}/../../../sharedlibs")

# This will load in external packages that we need to get JNI to work
find_package(Java COMPONENTS Development)
find_package(JNI REQUIRED)

if (JNI_FOUND)
    message (STATUS "JNI_INCLUDE_DIRS=${JNI_INCLUDE_DIRS}")
    message (STATUS "JNI_LIBRARIES=${JNI_LIBRARIES}")
endif()

include_directories(.)

# This will load all C++ code files onto variables so that we can link it to a target
file(GLOB HEADER_LIST CONFIGURE_DEPENDS "${PROJECT_SOURCE_DIR}/*.h")
file(GLOB SOURCE_LIST CONFIGURE_DEPENDS "${PROJECT_SOURCE_DIR}/*.cpp")

# link the code files onto our target. "shared" is important here, this is the magic that will make it so our compiled code comes out as a shared library.
add_library(my_native_library SHARED ${HEADER_LIST} ${SOURCE_LIST})

# Next we need to link JNI to our target
target_link_libraries(my_native_library PRIVATE JNI::JNI)

# After our build, copy the compiled shared library to our shared libs folder.
add_custom_command(TARGET my_native_library
        POST_BUILD
        COMMAND ${CMAKE_COMMAND} -E copy $ "${CMAKE_SOURCE_DIR}/../../../sharedlibs/")
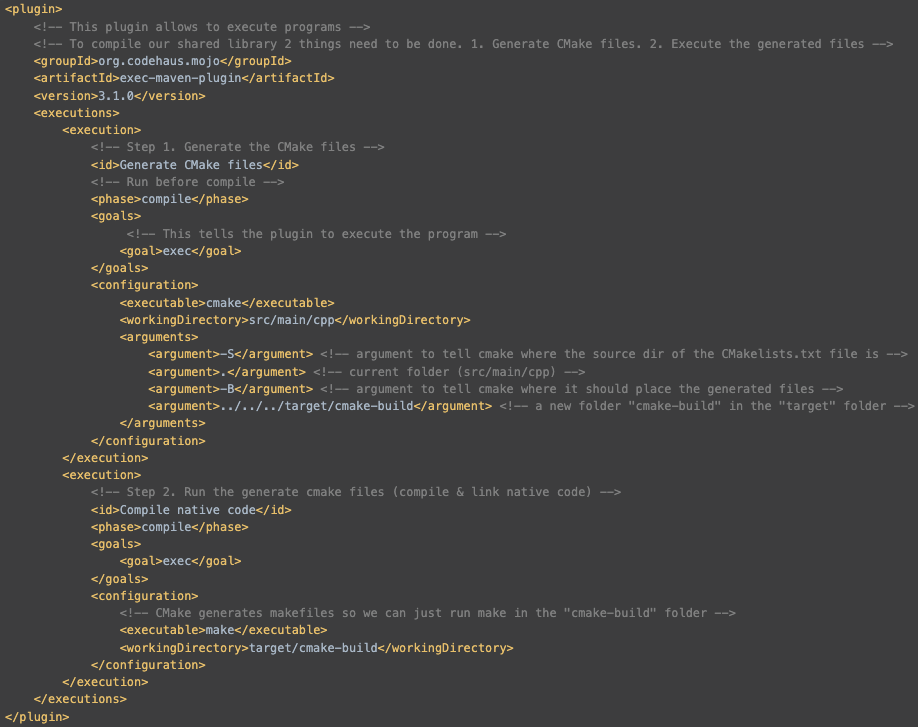
Now we need to call CMake, and preferably we would want this within our Maven lifecycles. Luckily, this can be done through plugins.
A plugin called exec-maven-plugin is crucial in this. Add the following to your Maven POM.
As a bonus, we would want to clear our compiled artifacts when we run the Maven “clean” command. For that to work, add the following plugin to your Maven POM.

Now that toolchain is wired up. Let’s run Maven “compile”. You should see something similar to this in your console.
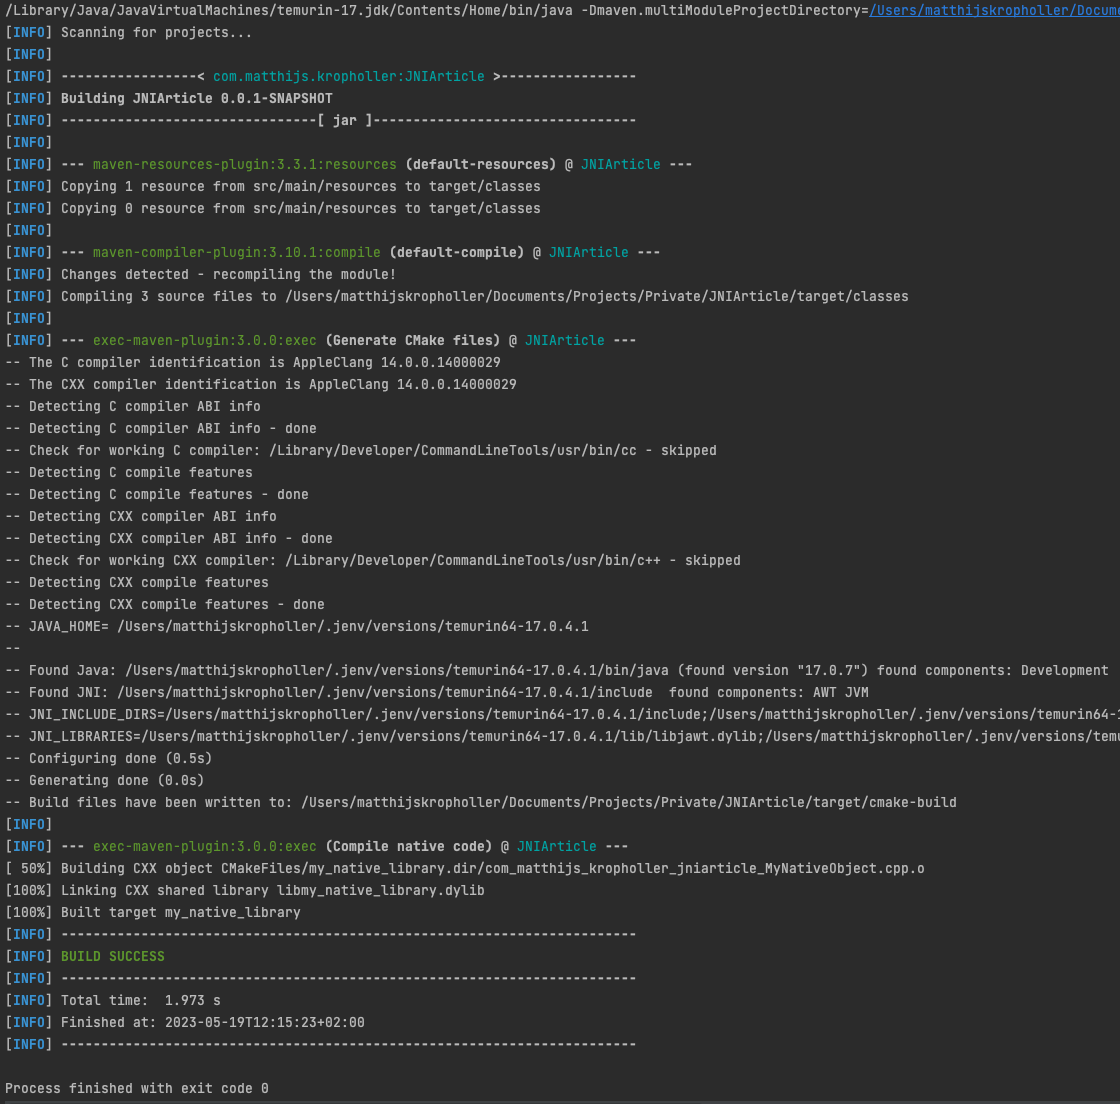
And voilà! You have compiled a native shared library at the same time as your Java code. After you have ran this, you should see a new folder in the root of your project. The compiled library should be in there.

Step 4: Calling our native code from Java.
It took a bit of preparation but the finish line is in sight. We have combined our C++ toolchain with Maven, we have the ability to generate header files, and we can compile our code. The project is set up in a way that allows you to freely add native methods to Java classes and their subsequent C++ implementations.
Now we will call our native code in Java. Open your main class and add the following code.
var nativeObject = new MyNativeObject();

nativeObject.printToStdOut();

int result = nativeObject.addNumbers(1, 1);
logger.info("Result from native code: {}", result);

MyDataObject dataObject = new MyDataObject();
dataObject.setName("Matthijs Kropholler");

logger.info("getName before running native code: {}", dataObject.getName());
nativeObject.manipulateData(dataObject);
logger.info("getName after running native code: {}", dataObject.getName());
The final result can be seen here. When the application has ran the following can be seen.

Congratulations, you have successfully called native C++ code from within your Java program.
Final words
This article provides a simple example on how to call C++ code from Java and also Java code from C++. This however, might not be representable to a real world scenario since it’s unlikely that a real world scenario is as simple as this is.
Something that was left out in this article but are important to consider when using this in the real world.
- Complexity
- Performance
Let’s start with complexity. As you saw, it is quite complex to set this up compared to an all-Java project, even for a simple example like this. Apart from the JDK, you need the other tools installed on your machine to get this to work. A C++ compiler and CMake. Not to mention that there are differences between C++ compilers, each have their strengths and weaknesses which may need to be considered. Apart from tools you also need to wire everything up using Maven and even have to manage a CMake file, something which a lot of Java programmers are not familiar with. The native code can also not be debugged easily which can make it very difficult to trouble shoot if there is a problem in the JNI-layer. It would have to be separately tested.
Next up is performance. Calling native methods is not “free” performance, in fact, it’s very slow for simple calls! JNI is quite useful for things Java cannot do, but C/C++ can or to optimize a long-running process that is incredibly slow in Java. However, it’s unsuitable for simple usage like shown in this article because communicating between Java and Native code has a cost associated to it.
Adding a stopwatch in our code to benchmark the calls shows the following on an M1 Pro MacBook:
---------------------------------------------
ns         %     Task name
---------------------------------------------
000011917  033%  native code AddNumbers
000000208  001%  java code AddNumbers
000015208  042%  native code Reverse String
000009084  025%  java code Reverse String
As you can see, the native methods are measurably slower than the Java variants are.
That being said, I believe that JNI definitely has its usages even if they are not common and I hope that this article may be used to get someone started with JNI.
The code backing this article can be found on the following GitHub page https://github.com/MattIzSpooky/JNI


